How to Buy Cruising Sails by Judy Blumhorst

After reading my post about my experiences buying a cruising sail for the O’day 22 online, Judy Blumhorst of Hyde Sails Direct offered to provide her perspective on purchasing cruising sails online. I think that it is a good summary of what I found through my searches online for information when I was researching new sails.


How to Buy Cruising Sails Online

Understanding the basics
of Sail Design, sail cloth & construction

By Judy Blumhorst, June 2015

One of the biggest expenditures a recreational or cruising sailor ever faces is replacing their sails. As the owner of an online loft (www.HydeSailsDirect.com), I know that cost and longevity are the biggest concerns of most customers buying new sails.

The cheapest sails, however, aren’t always the best value over the long-term. They don’t hold their shape for very long and will need to be replaced much sooner.

Understanding the basics of sail design, sail construction and sail cloth engineering will help you get the most bang for your sail-budget buck, and keep the wool from being pulled over your eyes by unscrupulous online lofts.

Q: When do I need new sails?

A: When your sails were new, your sailmaker designed an ideal shape for your boat and your rig, the type of sailing you enjoy, and your local conditions. Over time your sail cloth deteriorated, and the sail lost the shape your sailmaker intended it to have. The loss of shape makes your boat harder to sail and reduces your sailing enjoyment. When your boat won’t point as well as it used to, heels more than it used to and is harder to control, it’s time for new sails.

Even though your sails may not have any tears or rips, you will enjoy sailing much more if you replace your sails when the original shape is lost.

Q: Why is good sail shape important?

A: Obviously good sail shape is important for racing, but increasingly cruisers are realizing the benefits of good shape. Good sail shape translates into less heeling, better pointing, easier boat handling, and the ability to handle higher winds comfortably.

Q: What difference does the sailcloth make to me?

A: High quality, name brand sailcloth has low stretch, holds its shape for a long time, and is durable so it has a long, useful service life. Sails that are made from low quality Dacron last a long time without ripping, but they lose their shape quickly.

Q: Woven Dacron or Laminate? What is the Difference?

A: Since the 1950’s, woven polyester (Dacron) has been the most popular material for cruising sails. Over time, boats grew larger and cruisers demanded better performance from their cruising boats. Sailmakers and cloth manufacturers needed improved fabrics that could resist higher loads and retain their shape better.

In the 1960’s and 1970, laminate sailcloths were invented to fill the need for better shape-holding. The early laminates were plagued by durability problems, and didn’t last very long. Laminates and Woven sailcloth have come a long way since then. Today, modern laminated sailcloth is more durable than the old laminates.

Laminates are made by gluing layers of different materials together to form a sandwich. Basic laminates consist of two layers of plastic film sandwiched around load-bearing yarns. The fibers are carbon, Spectra/Dyneema, Twaron, Technora, Kevlar, Pentax and polyester. For cruising laminates, an additional layer of polyester is laminated on the outside to improve the fabric’s resistance to UV, tears and abrasion. Generally speaking of durability, most sailmakers assume that three to five years of frequent use is a reasonable lifespan for laminated cruising sails. With less frequent use, cruising laminates will last longer.

Today, highly advanced woven Dacrons can carry much greater loads with less stretching. The most advanced Dacron sails hold their shape as well as cruising laminates and last longer.

In the past 10 or 15 years, Challenge Sailcloth developed a Dacron named Warp Drive for use in radial-panel sails that holds its shape as well as most cruising laminates. Contender Sailcloth and Dimension Polyant Sailcloth invented high-tech ways to blend polyester, Vectran, and Spectra/Dymeema yarns together into hybrid woven Dacron. (Challenge Sailcloth makes Hood Vekton , Contender Sailcloth offers “Hybrid Fibercon” and Dimension Polyant offers “HydraNet Radial”).

Q: Why are the new radial woven fabrics so important for cruisers?

A: Woven Tri-Radial cloths are a big deal because they let sailmakers design and build tri-radial sails in woven cloth. Dacron is still the most durable fabric in absolute terms. Tri-radial construction deforms less under loads. Tri-Radial sails of Dacron have excellent shape retention and excellent durability. That’s a powerful combination for long-term performance and long-term affordability – a lot of “bang for the buck” for cruisers.

Sailmakers orient the panels to resist all the loads better and retain shape over time better, compared to cross-cut sails. Dacron Tri-radial sails offer owners excellent durability for long service life as well as excellent shape life, at a price that would have been inconceivably low in past years.

One important point to remember if you are buying a new sail is that the cloth used for a tri-radial sail and the sailcloth used in a crosscut sail are not interchangeable. Modern woven cloth for tri-radial construction is considerably more expensive than sailcloth for cross-cut sails. Name brands are Challenge Warp Drive ($$), Contender Hybrid with dyneema ($$$) and HydraNet Radial with dyneema ($$$$).

Q: Who manufactures the best Woven Sailcloth?

A: In the United States and abroad, four major suppliers of sailcloth—Dimension Polyant, Bainbridge International, Challenge Sailcloth, and Contender Sailcloth—provide sailmakers with Dacron, Dacron blends, and laminate cloths and related materials to build strong, state-of-the-art headsails and mainsails.

Q: WHY ARE THERE SO many different Dacrons?

A: There are many reasons for the multitude of cloth styles and prices.

Sailcloth manufacturers build cloths to meet a wide range of price points, from budget to premium.

Sailcloth engineers design dozens of different types of cloth so the sailmaker can choose the best cloth that will have the best shape under load.

Q Why do some Dacrons cost much more than another? Aren’t they all the same.

A: The more expensive Dacrons generally stretch less. They cost more because the raw materials cost more, the technology is more complicated, and they take longer to weave. Also, cloth manufacturers can demand a higher price because low stretch Dacron makes a better sail.

However, economies of scale during production greatly affect the price of sail cloth. Popular cloths which are produced in greater quantities cost less.

Also, production lofts that buy in massive quantities get lower prices from the manufacturer, and save on transportation costs too.

Q I’m a Cruiser, not a racer. What is the best value in sails for Cruisers?

A: As a sailmaker, customers frequently tell me that they want to buy the least expensive sails I sell because “I’m not a racer. I don’t need fancy sails”. I think that’s the wrong perspective to have when you’re buying sails. The less expensive sails don’t retain their shape as long as better quality ones. You will have to replace the sails sooner because your boat sails poorly sooner

Here’s a better way to look at it: In general, you should buy sails made of the lowest stretch cloth you can afford. The only time this doesn’t apply is when you are going to sell the boat within one or two seasons. All things being equal, the less expensive fabrics don’t hold their shape as long as the more expensive ones. When your sails have lost their designed shape, it’s time to replace it — even if it hasn’t ripped.

Q: I’m on a budget. What cruising sails should I buy if I can’t afford the “best Dacron”?

A: The answer is the same as before: Buy the lowest stretch Dacron that you can afford! It will give you several years of good service. But in the long term, you will need to replace them sooner than the less expensive Dacron.

Q What should I tell my sailmaker when I’m buying new sails?

A: I’m sorry, but that’s a trick question! You can tell your sailmaker whatever you like, but it’s the sailmaker’s responsibility, not yours, to get all the important information necessary to select the right sail for your needs. At the least, the sailmaker should interview you to find out the following important needs:

  • Your sailing experience and level of skill
  • Your expectations about performance
  • Your expectation about durability
  • Your expectations about ease of use (Are you willing to “baby” the sail or are you more casual about how you treat your sails?)
  • Your time horizon for using the sails
  • Your sailing style (eg race vs cruise, set-and-forget cruiser vs string-pulling-trimming cruiser)
  • Budget
  • Miles/hours sailed per year,
  • Climate (humidity, UV)
  • Wind range and sea state on your cruising grounds.

Q: How do I avoid “getting the wool pulled over my eyes”

Unfortunately, there are a scam artists on the internet who sell inferior products, misrepresent the goods or use counterfeit imitations of name brand cloth. I have personally examined sails that were made of a less expensive, inferior Dacron sail cloth than promised. Those owners told me their horror stories when they hired me to be their sailmaker after being ripped off by a dishonest online loft.

It’s particularly easy to scam people buying new sails because the average sailor can’t tell the difference between cheap sailcloth and expensive sailcloth once the sail has been delivered. The crook substitutes cheap cloth for expensive cloth and pockets the difference. The substitution isn’t obvious for a year or longer, when the shape of the sail deteriorates rapidly. By then, it’s too late for the buyer to do much about it.

Ultimately, the most important factor in choosing your sailmaker is their reputation. Make sure you carefully check the reputation when you hire an online loft.

  • Do some research online about the firm. Check the Better Business Bureau and Google. There are very few complaints online about honest and competent sailmakers.
  • If you discover numerous complaints about quality or service during your online research, don’t buy from that business. As the saying goes “Where there’s smoke, there’s usually fire”.
  • Do some comparison shopping, but don’t be seduced by super low prices. There are several well established online sailmaker lofts with good reputations on Google. If a small non-name brand loft claims to be able to sell the same sail for 30% less than the other online lofts, exercise extreme caution. If the price at one online loft “is too good to be true” be very, very cautious. Don’t let the promise of a low price cloud your judgement.
  • Get the name of the person advising you on cloth selection online and check his sailing resume online.
  • Get the name of the person designing your sail and check his sailing resume online.
  • Get the name and physical address of the loft building your sails. Honest lofts don’t hide where their sails are built.

CAUTION IF YOU ARE BUYING SAILS ONLINE: The cost of the cloth is the biggest factor in the price. Protect yourself against a “bait and switch” on the cloth. Insist that the invoice shows the brand name and manufacturer’s style number of the cloth in writing. A weight designation is not a style or part number. Don’t accept vague descriptions that don’t include the style or part number!

Understanding loads on Sailsi

Challenge makes two versions of many of its super-premium & premium woven dacrons: High Aspect and Low Aspect. They engineer different constructions to align the strength of the fibers with the load direction of the sail. One is not better than the other. They are both engineered for a specific application.

Loads on High Aspect Sails

Loads on High Aspect Sails

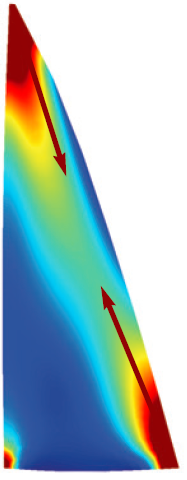
A high aspect sail is tall and narrow. By definition, the luff is at least 2.9 times as long the foot.

It generates the most load along the leech. A High Aspect cloth generally has larger fill yarns and is very strong in the fill direction. The warp yarns almost touch each other in the weave, creating tunnels in the construction which keeps the fill yarns geometrically straight and low stretch.

Loads on Low Aspect sails

Loads on a Low Aspect Sail

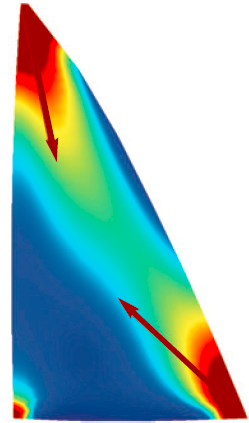
A Low Aspect Sail is short and wide. By definition, the luff is less than 2.9 times the length of the foot. The loading directions are not parallel, and run more toward the center of the sail.

Low Aspect cloths generally have larger warp yarns than in a high aspect fabric, and while the fill yarn is bigger than the warp yarn, they are closer to equal size than in a High Aspect Cloth.

There is more even crimp between the two fibers. The even crimp allows the yarns to grab each other, thus creating a strong resistance to bias stretch.

Understanding How Panels for Sails Are Cut
Aligning loads with Low-Stretch Yarns

CrossCut Sails

Cross Cut Sail
Cross Cut Sail

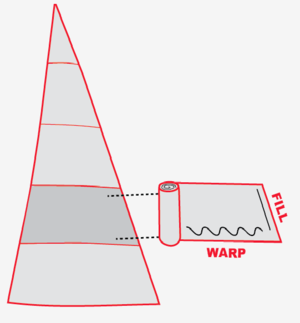
Crosscut sails have long panels that go horizontally across the sail, perpendicular to the leech and the heaviest loads on the sail. The yarns that go the length of the cloth are called fill yarns. The warp yarns, which cross at 90 degrees, are woven over and under the straight fill yarns. The technical term for bending the yarn is called “crimping”.

For crosscut sail panels, yarns in the fill direction have minimal stretch because they are relatively straight. The yarns in the warp direction are comparatively stretchy because they are crimped.

Tri-Radial Sails

Tri-Radial Cut Sail
Tri-Radial Cut Sail

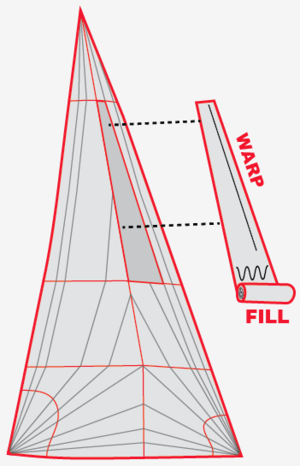
Tri-Radial sail panels align the straight warp yarn with the load direction. The panels must be cut parallel to the length, not width, of the sailcloth

The best Dacron cloths for Tri-Radial sails, like Challenge Warp Drive or North’s Radian, have zero crimp in the warp yarns. Challenge Warp Drive costs 200-300% as much as entry level Dacron for CrossCut Sails because it is very time-consuming to weave and produced in lower quantities than crosscut Dacron.

Designers cannot use fill oriented cloth to cut panels for tri-radial sails. If you do, the loads are being carried by the heavily crimped fill threads, and the cloth will stretch badly.

Beware of “knock-off” Tri-Radial Dacron sails at unbelievably low prices. Dishonest sail lofts sometimes use ordinary inexpensive fill-oriented Dacron to build Tri-Radial Sails and pass it off as Warp Drive. They get away with it because most buyers can’t feel or see the difference. The highly-crimped yarns are too stretchy to resist the loads in the sail, and the sail will stretch out of shape very quickly.

——————

Portions of the post above were reproduced or borrow heavily with permission from Challenge Sailcloth http://www.challengesailcloth.com

New Sails (I hope)

The original mainsail.

Okay, I’m done complaining about the snow. At least until the next time it snows this spring.

I have had the O’day 22 in the water for the past two summers. The mainsail is (I believe) the original. Which makes it older than me. But not by much. And in worse shape than me (I hope).

The luff (front edge that goes along the mast) is fraying and needs a new boltrope. I think I could probably replace the boltrope – a replacement is only $2.50/foot at Sailrite. It shouldn’t be too difficult to sew the rope in a straight line. But the last time I tried to sew something in a straight line it didn’t work as well as I though. And maybe the mainsail isn’t the best thing to learn on.

Even if I fixed the boltrope, the rest of the sail is a mess. One of the seams on the luff (trailing edge) is coming apart. One or two of the battens are missing. And overall the sail is tired and stretched out and my windward performance is terrible – though, honestly, that may be due to my lack of sailing ability.

It was time to replace the mainsail. It was time to replace it two years ago. But I finally placed an order this spring. I decided to go with Peak Sails North America. I placed an order with them because they were inexpensive and allow me to spread the costs of the sail over 4 months (the sails are made after the first payment). They also had mixed reviews about how long it took for them to make the sails and for their customer service. However, I figured that the price was right and that I would have some leverage with their sail payment plan, so I placed an order on Monday.

They were pretty quick to send me an email back and send me the first bill. I hadn’t heard from them by Friday to confirm the sail size and number, so I gave them a call. Chris Stevens (Peak Sails Customer Service) picked up on the 2nd or 3rd ring, and quickly looked up my order and took the information down (sail number). He said the sail would probably go to production this week and be delivered in 3-4 weeks. It was a much better response than I had expected.

Chris explained that the production line gets backed up in May and June and could take a lot longer – people get their boats in the water in May and June and when their sails fail it is a crisis to get new sails.

So far I’m happy with the customer service at Peak Sails. They may not be the most responsive by email – but they did answer the phone and answered my questions. Hopefully the sails show up promptly and this summer I will only be able to blame my lack of sailing skill (and the boats shallow keel) when I have poor windward performance.

Yet another sailing post!

Maybe a month ago I complained that we had hardly used the sailboat this season. It wasn’t any one person’s fault in particular. We just had a busy summer. However we have been out each of the past three weekends, with two overnight trips. Not a bad way to finish off the season. Hopefully next weekend I’ll get one more final sail in – the trip from Niantic River to the Thames where I will pull the boat out of the water.  Maybe I’ll even raise a sail (or two) if the winds are favorable.

Ben enjoying his backpacking dinner (freeze dried chicken and mashed potatoes).
Ben enjoying his backpacking dinner (freeze-dried chicken and mashed potatoes).

This weekend we did a quick overnight on Friday (after work and school). We had originally planned to go to Giants Neck again, but we got a late start, so we camped maybe a 1/4-mile south of the mooring on the Niantic River.

We had the boys and the dogs this time around. It was a little crowded. Okay, very crowded. We did get all six of us below for a period in the middle of the night, but Targa gave up and he slept in the cockpit most of the night. I got up about every hour because either one of the boys was up and about (going to the bathroom, or just hot) or the dogs were restless (because they are dogs and at times annoying).

I think next year if we all go camping again we will have to make some modifications to the boat. We need a little better storage, and it would be very nice to leave more supplies on the boat (such as plates and silverware).

Susanna taking the dinghy ashore in the late evening.
Will and Targa sharing a bed. It wound up being too tight for Targa to spend the night on the settee berth.
Will walking Tucker on Saturday morning after sleeping on the sailboat.

Tomorrow is a ‘hang around the house and take it easy’ day!  I can’t wait.

A tour, boat painting, friends over, playing in the sprinkler morning.

Will, Ben and Tyler at the former Norwich State Hospital property

We had a busy morning. The town of Preston was offering a bus tour of the former Norwich State Hospital, Will and Ben wanted friends over, and I want to get the boat ready to get in the water next weekend.

We picked up Will’s friend, Tyler, on the way to the hospital tour, and the boys were surprisingly well-behaved for the 40 minute bus tour, even though they probably got a little bored by the end. However, they all took lots of pictures and will probably post some on their blogs later today (I think Ben took well over 100 pictures during the tour).

After we came home, I moved the boat and mowed the grass under it. Then the boys helped me paint the bottom of the boat (second coat) – so all I have to do is jack up the boat to paint where the rollers touch, get the outboard running, and finish varnishing the tiller handle – not too much to do in a week.

The boys are out running through the sprinkler enjoying the sunny warm day while I try to get green paint spots out of my hair, write in my blog and make lunch.. It is nice to have a kind of odds-and-ends sort of day.

Will and Ben on the bus tour of the Norwich State Hospital property.
The boat, bottom painted and almost ready for the water.

Sailboat – getting ready for the summer

The final life line installed on the O'day 22.  Now ready for the summer.
The final life line installed on the O’day 22. Now ready for the summer.

The forecast called for rain all day yesterday. But, if the weather people could predict the future, they would probably work in the stock market. And be rich.

The rain had stopped by the morning. The stream in the back of the yard was pushing over its banks and running over the stone bridge in the back yard. By the afternoon the yard had dried enough to do some chores.

It takes two people to attach the deck hardware on the sailboat. One topside keeping the bolts from turning, and one below with a wrench. Normally it is a chore to find an assistant.  Apparently tightening bolts isn’t the most exciting family activity. But yesterday I had a captive audience.  Will had gotten in trouble for hitting his brother yesterday – he was either stuck in his room or helping with chores. And apparently the most exciting chore available was to work on the boat. I’m not sure why he didn’t find cleaning the refrigerator exciting.

It took us no time to install the two stanchions and the one missing eye bolt. Now the boat is ready for the summer. Or, as ready as I plan on getting her this spring. Of course, she needs the bottom painted, new bulkheads made, a better paint job… the projects are endless. Just not for this summer.

The hope is to launch her next Friday or Saturday and leave her at the marina on the navy base until August.

Boom Vang

Tonight the parts arrived from Nautos – USA for the boom vang. I took a few minutes to install the hardware tonight after work.  The mast looks like it has a connection for the vang from before.  The only part that doesn’t fit quite right is the curved key to fit in the boom.  It is a little too large for the existing setup.  I’ll keep looking for a slightly smaller key to replace it with (they are cheap).  I got the rope as a remnant at Defender Marine over the weekend.

Boom vang installed on the O'day 22. The blocks are from Nautos and are laser replacement parts.
Boom vang installed on the O’day 22. The blocks are from Nautos and are laser replacement parts.
Where the vang connects to the boom.  The key is a little large for the slot - I'll keep looking for a slightly smaller key
Where the vang connects to the boom. The key is a little large for the slot – I’ll keep looking for a slightly smaller key
The vang attaches to the mast with a line looped around the mast (and run though an eye strap on the forward edge of the mast)


Sailing!

Our O'Day 22 sailboat in the Thames river for the first time
Our O’Day 22 sailboat in the Thames river for the first time

Our sailboat has spent many years, first sitting next to the garage in Ledyard, and then (mostly) inside our garage here in Preston. I got the sailboat before William was born, so it has been sitting around for over 10 years. Getting the boat in the water has been one of those great ideas. But for so many years, it has been just a dream. I loved thinking about sailing. I even loved working on the boat, but after a while, it would get old, and I would lose momentum on fixing it up.

Something always came in the way. First it was kids – it is a crazy change in how much free time disappears after kids (but it is well worth it). And then a second kid.  It sat through a move, a divorce and my own ADHD. And pieces and parts that I had taken off wandered away, lost in all the transitions, and the trailer rusted away under it.

Will and Ben (and Panda) enjoying the day

I wanted to get it in the water last summer. But of course summer got in the way. There is always lots to do in the summer. And I’m not good at finishing things. Certainly not good at finishing things when there are lots of distractions (like in the summer). But I was able to get the trailer fixed last year.

So, this year I decided to pick a date to put the boat in the water. The boat didn’t have to be perfect. It had to float. Enough of the hardware had to be reinstalled or replaced to get it sailing.  The trailer had to make the 10 mile trip to the launch and back.

My goal was to get it in the water on the 17th of April if the weather supported it. And, yesterday, I made that goal. We launched the boat near the head of the Thames river in Groton, CT. The boat launch is directly under the I-95 bridge over the river. We then motored under the railroad bridge (with a couple foot clearance for the mast) and put up the jib and sailed out towards Pine Island.

The weather was perfect for a first sail. The wind was very light – perfect for a first try. We didn’t have anywhere in particular to go, so we could just slowly move along. It is also very early in the season, so there was almost no traffic on the river (a couple of passing ferries, and an outbound submarine with coast guard escort).

Susanna and I enjoying our sail

After reaching Pine Island we headed for Ledge Light and then back up the river. The wind was heading directly downriver and was light. I had a lot of trouble trying to get the boat to move upwind at all – something I’ll have to work on. Eventually we gave up and started the outboard and motored the rest of the way in.

The light wind and bright sun made the ride warm and enjoyable. I had been worried that everyone would freeze on a mid-April outing.

Of course, a couple of things learned from the day out:

  • Stepping, launching, retrieving and unstepping the mast is a lot of work. I think we will try to find a place to keep the boat in the water for a month or two this summer.
  • The mainsail is in pretty rough shape. I’ll need to replace it before next season, but I want to figure out how to best use the headsails this year, so I won’t worry too much about the main.
  • We need a long dock line for launching the boat. The 20′ dock lines are a bit too short.
  • The cabin needs to be better organized. That is Susanna’s job.
  • A couple more cleats would make life easier topside.
  • I’ll need a way of telling how fast we are going if I am to ever figure out how best use the sails.
  • Before we go to sea again, I’ll reinstall the life lines. Not a big problem on a day like yesterday, but it will make everyone more comfortable going forward.
  • We need a curtain to give some privacy to the porta-toilet.
New London Harbor and Pine Island

Looking like a sailboat

The mast raised - looking like a sailboat now!!
The mast raised – looking like a sailboat now!!

I got the mast up today. Finally! After a complete a$$ kicking last time, I took time to plan raising this mast. And I only dropped it once. And no one got hurt and nothing was broken.

So it’s not a one person job to step the mast yet. I don’t think it would be difficult to modify the system to allow me to raise it by myself, but for now, I am okay with it being a two person job raising the mast.

I built a mast support at the aft end of the cockpit. I used the two gudgeons that I had ordered to keep the mast support from falling down. I take the mainsail halyard and run it to the winch on the trailer. I had Will winch up the mast as I walked it up from the cockpit.

It is way too windy today to even attempt to put up any of the sails, and I have the jib halyard tangled up in the standing rigging (I’ll fix that when I take the mast down next time.

We confirmed that the masthead light worked tonight. The boys are getting pretty excited about sailing.

I still have to get the outboard motor out and make sure it is working. I also have to put the last toe rail on and clean up the inside of the boat. And the final step is to put the lights on the trailer. Of course it has been a bit cold and windy – not to promising to put the boat in the water in 10 days. But we will see.

The mast support installed. I will probably add another support lower on the post for storage of the mast.

A couple of lessons learned from today:

  • The boys are both surprisingly good helpers when it comes to attaching the deck hardware. It is easiest if I have them inside the boat with a wrench while I tighten the fasteners from topside.
  • Ben is a champ, he won’t stop working even after he draws blood when he scrapes his hand or after hitting his head on a sharp corner (not drawing blood, but hurting a lot I’m sure).

… and there was light

New switch panel installed in the boat (below the starboard settee)

Okay, so my labors in repairing the sailboat are nothing compared to that of creation. Nor is the labor close to that of slaying the Nemean Lion  However, it is one of my longest unfinished projects, so finishing any of the tasks to get the boat into the water is a big accomplishment for me.

Then again, a 40 year old boat is probably never a finished project.

Today I created light. Well, at least I hooked up lights. I installed the new switch panel and battery. I had run new wires to the bow light and the interior cabin lights. I tied in the old wiring to the stern light and the masthead light. I turned on the switch, and there was light.

All the lights have either LED bulbs or are low draw bulbs (such as the masthead light). The battery I have is a 35Ah AGM battery. It isn’t nearly as big as most boat batteries, but I figure we won’t be using that much power. And there is room to put another battery the same size next to the current one.

The battery sits on a wood (plywood) platform on wooden supports that I fiberglassed onto the hull. I have a strap holding the battery down to the platform.

rear of switch panel (installed). The battery is on the left side of the picture

The switch panel was made from sapele and has 6 circuits, each with independent fuse holders under the switches.

I used round panel mount switches and panel mount fuse holders. A couple of lessons learned:

  • Use good components. I got cheap fuse holders, and I hate them. The good ones I picked up from Defender were well worth the couple of bucks I spent on them.
  • I couldn’t find a good source of high quality switches, so I ordered them off of eBay. Get spares. The quality isn’t always the best – I found one of my switches arrived broken, and don’t have a spare.
  • I’ll probably add a dedicated USB charger one of these days (before any long days out).
  • The wood panel is much thicker than the panel mount hardware is able to handle. I needed to drill out a recess behind the fuse holders so I could thread the nut to hold them in. I should have drilled recesses behind every hole prior to drilling the holes. The switches would have snapped in better if I had a recess behind their holes. As it is, I had to use a drop of epoxy to keep the switches from rotating and popping out.
  • I used all 16ga wire. I probably could have gotten by with using 18ga wire for all the lights, but it wouldn’t have saved much money anyway.
  • I think I would try to put the negative bus bar and the terminal block strip on the same side of the panel. Right now the positive connection for each circuit is at the forward end of the panel, and the negative bus on the aft end. That makes the cabling a little messier.

The switch panel is relatively simple. The to cables from the battery go to a double bus bar. All the negatives return directly to the negative bus. All the switched circuits go from the positive bus to the fuse holder, and then to the switch. From each switch I ran a wire to a terminal block strip. That allows me to build the entire switch panel in the workshop, and just connect each load to the appropriate terminal block (and negative bus on the other side of the panel).

Since the switches are lighted, I also needed a negative from each switch to the negative of the battery. The negative terminals for each switch are connected in a daisy chain back to the negative bus.

Currently the only electrical connections in the boat are the navigation lights, a pair of interior dome lights and a single 12V outlet.

In addition to making light, I was able to make progress on some other boat projects. Susanna helped me install two more toe rails (I have one left to complete). The boys and I made a run to the Defender warehouse to pick up some more hardware (a couple of shackles and padeyes) as well as pick up Ben a short sleeve wetsuit.  Both boys saved their allowances and purchased sit-on-top kayaks (I won’t complain, it is better than spending it on electronics, and we were able to find them for a steal online). The kayaks should show up in two weeks, so I figured getting some warmer water clothes may be good for this spring.

I am also making a plan on how to step the mast without killing myself. I ordered two parts from Nautos to help make the supports I need, a pair of nylon gudgeons:

Nylon gudgeons to be used in making a mast support/raising system.

More on that project when I finish it…. Hopefully tomorrow.

(Almost) Raising the mast

View of the boat from the bow. Needs the mildew cleaned off, but most of the topside hardware is installed

So, I couldn’t get it up this evening. No not that… This is a (mostly) family friendly blog.  I tried to step the mast tonight after work, but couldn’t get it all the way up. The standing rigging isn’t adjusted properly, and it was too cold (and dinner time) to spend much time playing around adjusting the rigging.

Plus it is a bitch to step the mast (okay, so not so family friendly tonight).  I need a better system for raising the mast. I’ll have to build some sort of support to put on the stern of the boat to help raise the mast. Maybe use one of the halyards to help pull the mast up once it is part way up.

I’m getting close to getting the boat ready for the water. The goal is still April 17th. But not if it is still this cold.

We had a tease of warm weather this Saturday. But only a tease. This week has been back to cold and windy. However, I can tell that spring is coming. The evenings are cold, but not bitter cold.

I was able to get a lot finished on Saturday. Mark came over to work in the woodshop and brought his 12-year old nephew to hang out. His nephew, Greg, was a huge help on the boat. One of the biggest pain in the a$$ is to get the bolts tightened on the topside hardware. It requires two people, one below and one topside. Will and Ben are a little too young to be helpful (and not very patient) and Susanna is super busy with school.

In a couple of hours we got most of the hardware reinstalled.

Sunday I installed the chainplate that had been removed for the fiberglass repair on the deck. I also removed the mast post and built a new one from sapele. The old one was pine and had rotted on the bottom. The sapele is much nicer looking. And heavier.

New chainplate installed on the starboard side.

I’ve been working on rewiring the electrical system in the evenings this week. I hope to have the electrical finished this weekend. I have to still install the toe rails, but that needs adult help to get installed – hopefully I can talk Susanna into taking time this weekend to help some more (she already put in an hour or so this week helping with the toe rails).

I also need to figure out how to step the mast without killing myself. Or breaking the boat.  I’ll post more pictures of each project as I make progress.