This weekend was pretty busy. On Saturday we had Ben’s birthday party at a local park (Sawmill Park). It was a perfect location for a game of capture the flag. And with only 6 kids at the party, there was a lot of running. Even without a large turnout I think it was one of the better birthday parties that we have thrown.
Ben hanging out waiting for the party to start
The weather this weekend was perfect, not too hot and a nice breeze.
And more hanging out on the rocks at the park…
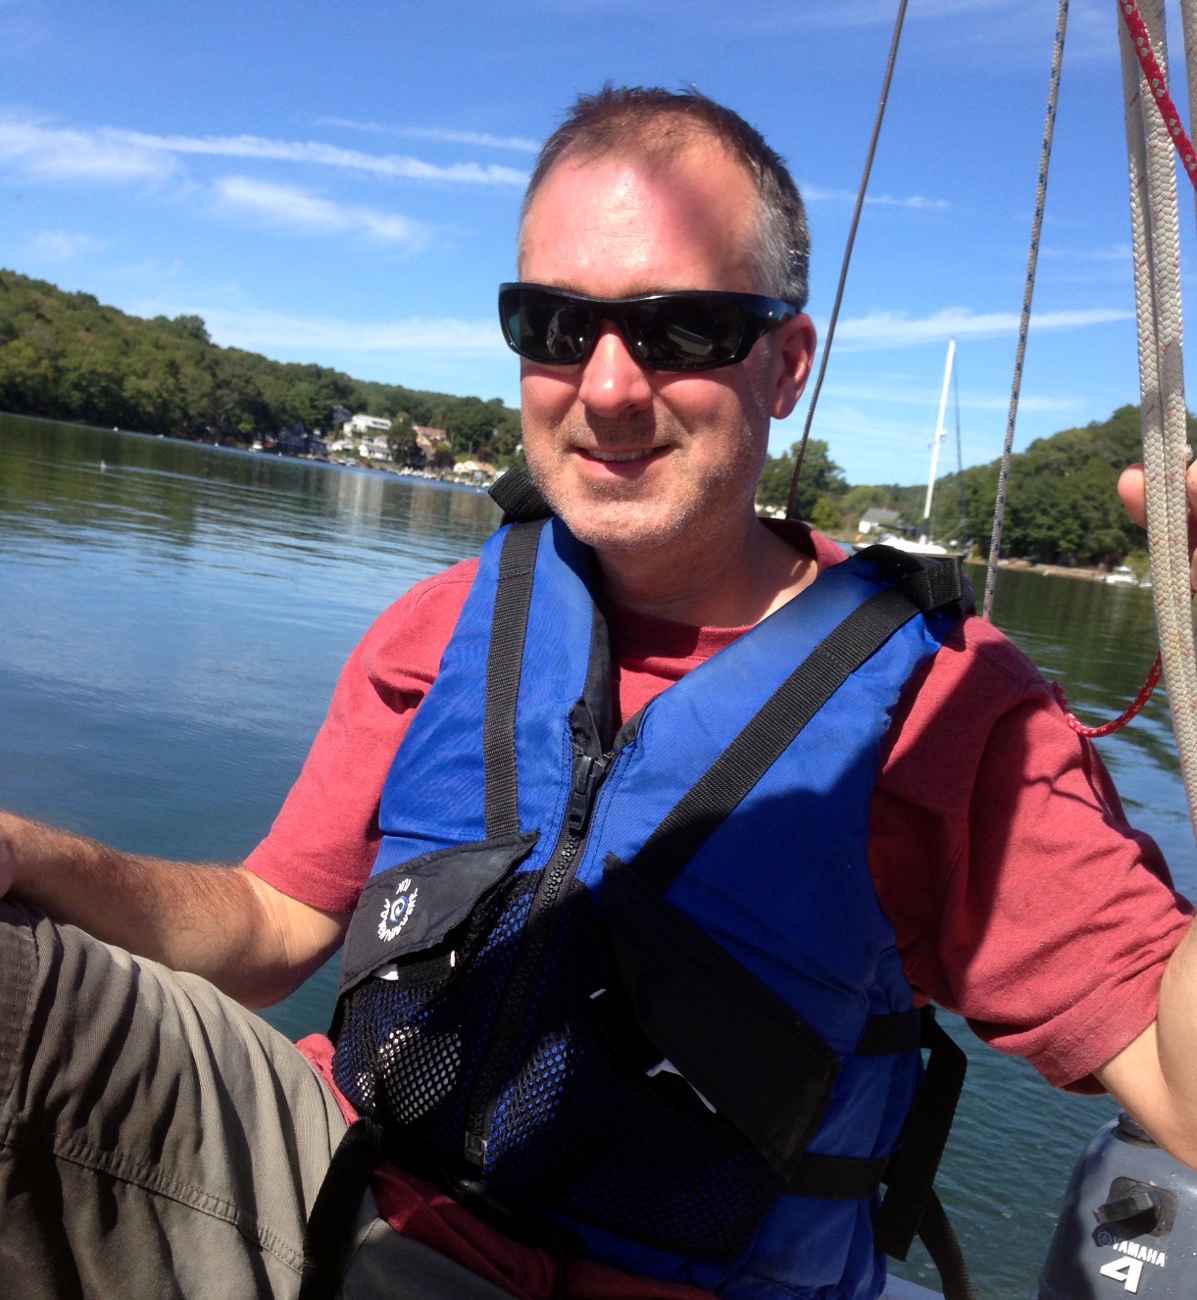
On Sunday, Susanna took Ben to the Drunken Pallet in New London for an afternoon of paining. Will and I took the afternoon to motor/sail the boat from the mooring on the Niantic River to the boat launch on the Thames River.
The weather was perfect for sailing with a good breeze on Long Island Sound and the tides were with us. The trip took about 4 hours, plus time to retrieve the boat and unstep the mast. We didn’t get much sailing done this year. With a new family member next summer and lots of family visiting we won’t put the boat in the water next season. If things work out we will sell the boat and in a couple of years look for a bigger one. I think having the boat in the water every summer is a bit much right now – I have too many things I like doing in addition to time on the water. Anyway, Ben has a power boat that we need to finish up and try to get in the water one of these summers.
Enjoying the motor down the Niantic River (photo by Will Curtis)
Today we got good news. The baby is looking good and the ultrasound went very well. We could also tell that the baby is no longer an “it” and is now a “she.”
We expect that in mid-February we should have a new member in the family, Isabella Louise Curtis. Will and Ben will get a new baby sister and the dogs will gain a new human to pull ears, tails, and other private body parts. Of course, ultrasounds aren’t 100%, so if “she is a he” (as Ben would say when he was little) then we’ll have to start the name game again.
Overall it has been a busy month and I haven’t found time to write in over a month. The past 5 weeks spanned a trip to Sweden for Sofia’s wedding, the boys returning to school, Susanna returning to work part-time, and a trip to Hawaii (yes, work is tough.) Hopefully as things calm down this fall I can catch up on posts and add pictures from the trips.
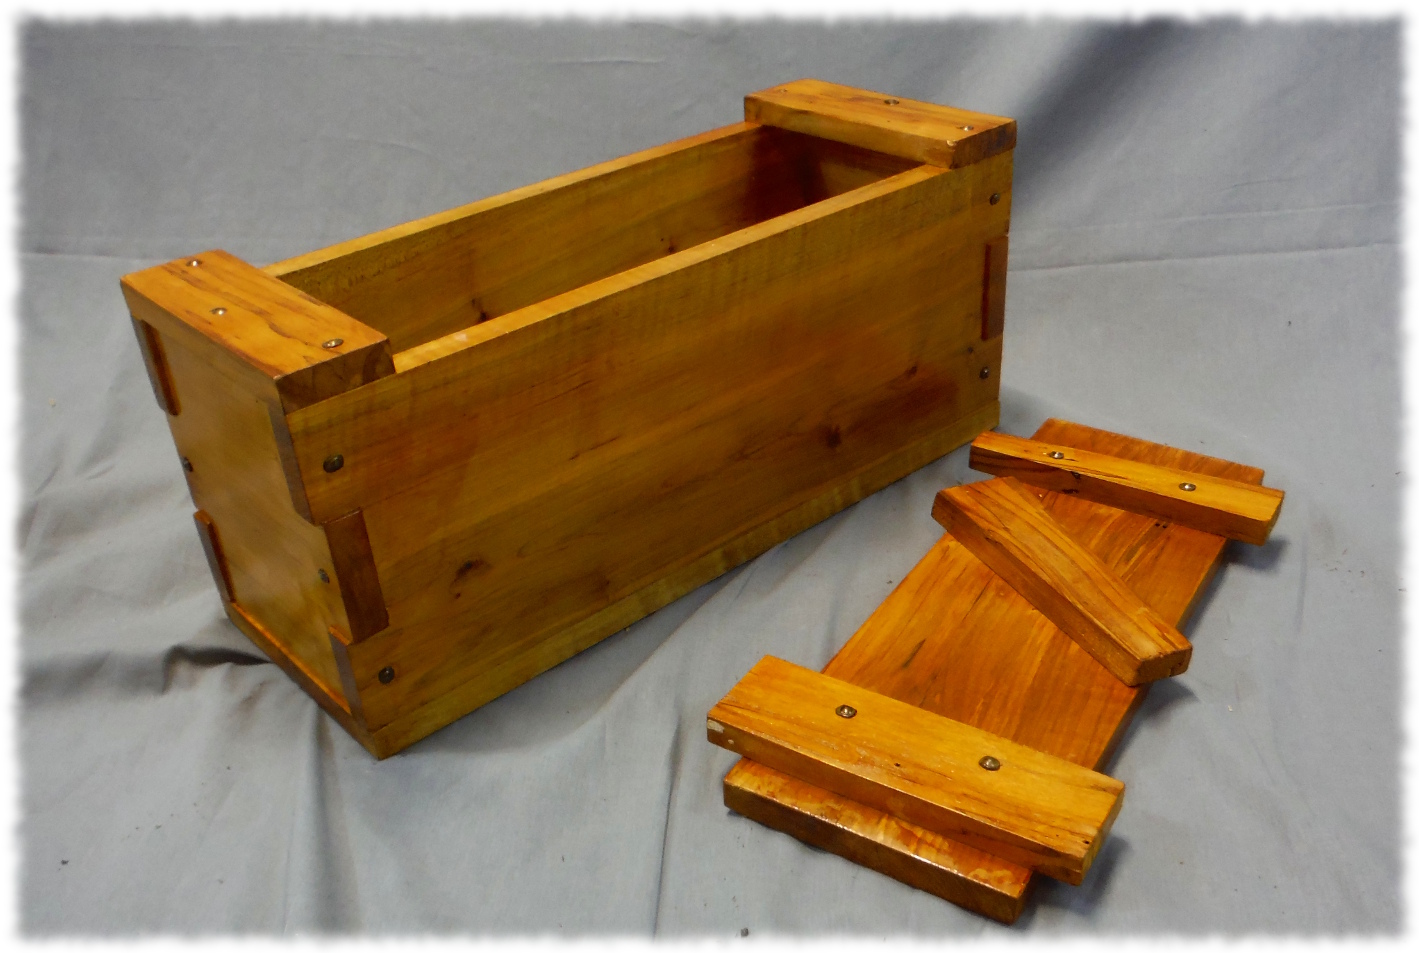
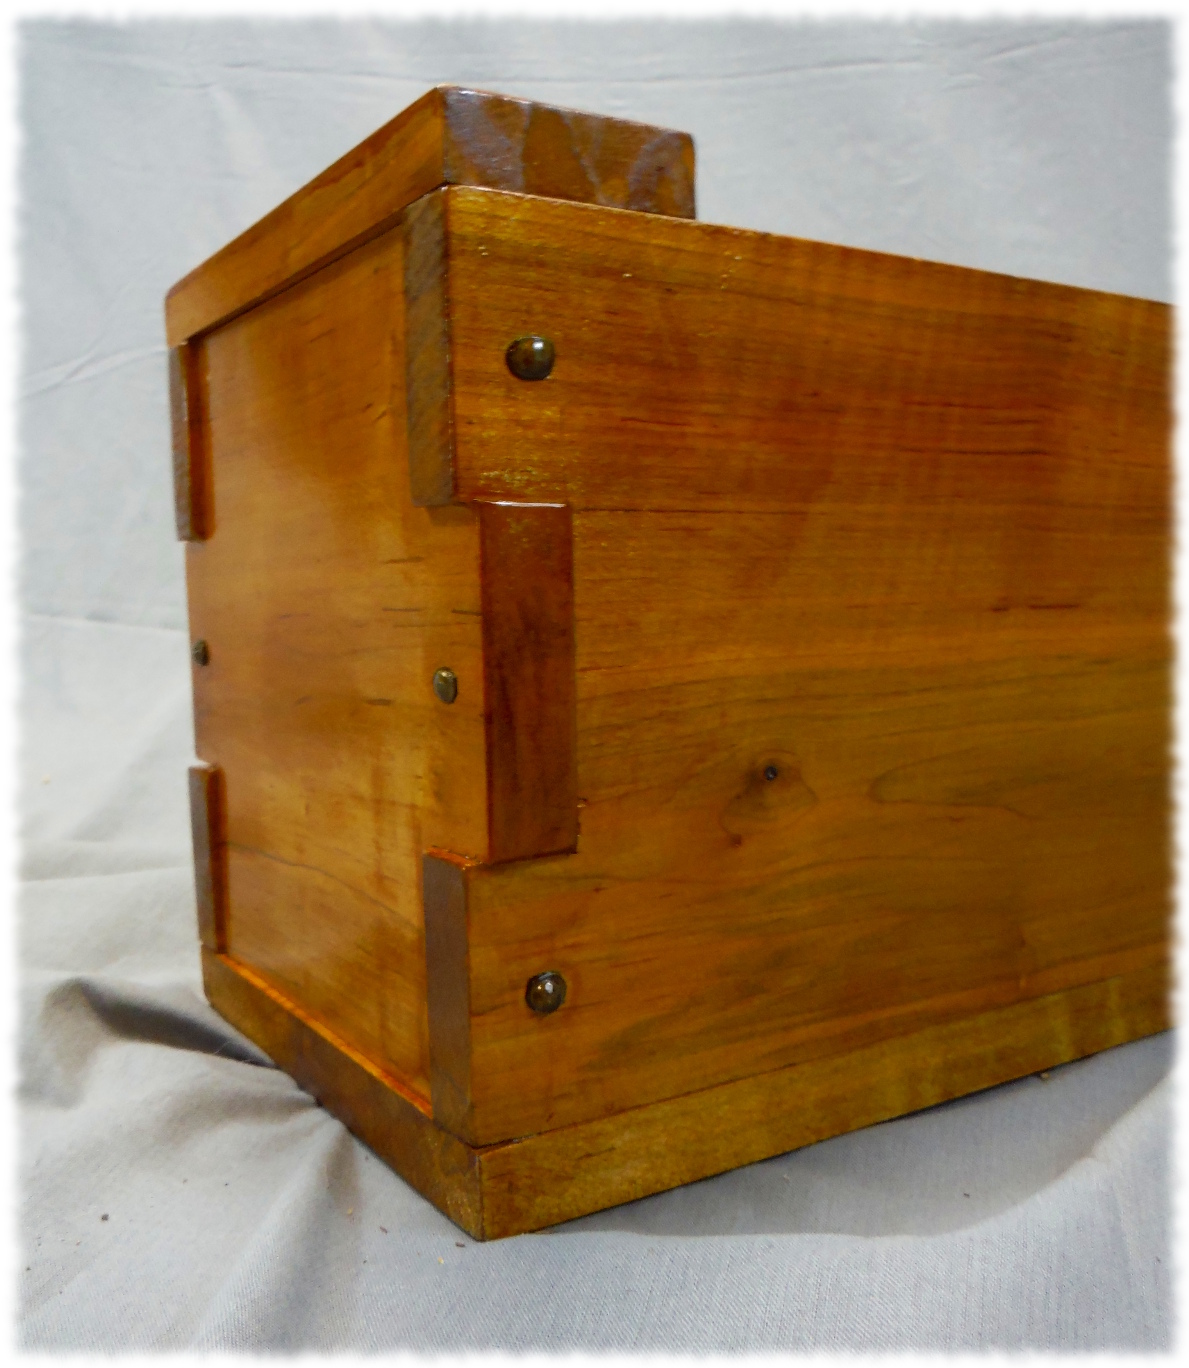
Benjamin’s Japanese toolbox completed (minus handles). Made from maple and finished with shellac.
I try to get the boys into the workshop a couple of times a year and build some smaller projects. It seems that it is an easier sell for Ben than for Will. However, Will does get into the projects once we get started (he just gets distracted easily – but who doesn’t).
This project was a pair of Japanese toolboxes. The boys picked out lumber earlier this week. Ben picked out a piece of maple, and Will picked out what appears to be pine.
The boxes are constructed with a simple box joint and cut nails. We are finishing them with shellac and wax. We were able to get Ben’s box completed today, and hopefully get Will’s finished tomorrow.
Joinery detail from Ben’s toolbox.
We cut the joints on the table saw. The boys probably could have cut the joints using a hand saw in the pine, but the maple was way too hard to cut by hand. All the pieces were assembled using 2″ cut nails by Tremont Nail Company. I picked up some decorative rose-head nails to add to the character of the box. The battens on the top were nailed and clinched.
The first box turned out pretty nice. Now to find some nice handles to attach to the ends.
This weekend I (quite contrary to my ADHD desires) didn’t start any major projects and instead worked on finishing up some smaller ones. I know. Crazy. Finish projects and not start any. What fun is that? But it keeps the wife happy, so that is worth something.
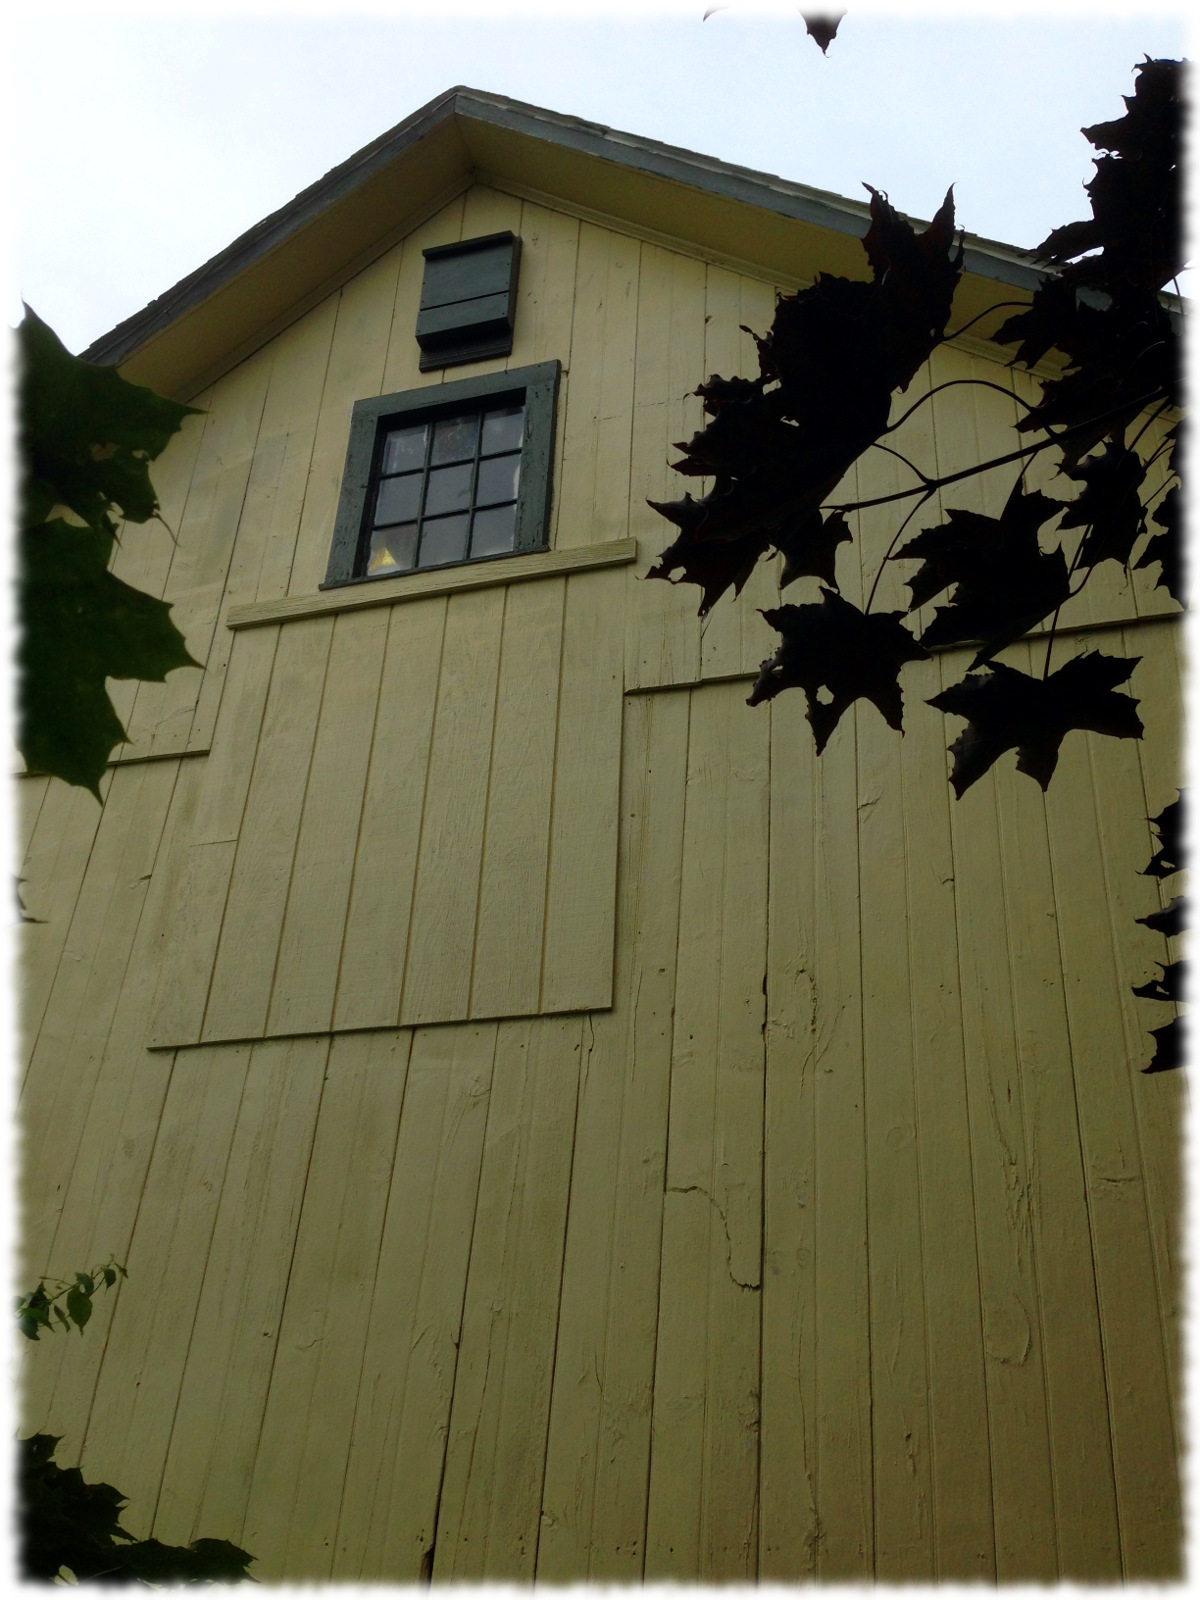
Will’s bat house hung on the side of the garage above the loft window.
The boys and I added two more shelves to the lumber rack. We brought all the lumber up that was stored under the barn (and wasn’t already on the lumber rack under the barn). That allowed me to clean out a little under the workshop and get the trailer pushed all the way back in.
It was amazing to watch Will and Ben work together to bring up the lumber from under the workshop. Or rather, fail to work together, so each had to drag boards individually. But, I guess that is what brothers are for. Of course I didn’t take any pictures of the upgrades/cleaning so you will just have to take my word that I actually did the project. Susanna even helped by labeling the now-somewhat-organized stacks of lumber. In English and Swedish.
Last week Will and his friend, Morgan, painted the two bat houses that they had made with me a couple of weeks ago. Morgan didn’t have any exterior paint at her house, so both bat houses were painted with the green trim paint from our house and barn. Yesterday Will and I decided to hang his bat house. Will even helped me drag out the tall ladder and set it up. The bat house is high up on the south face of the garage (above the chicken coop). Now all we can do is wait and see if we get tenants.
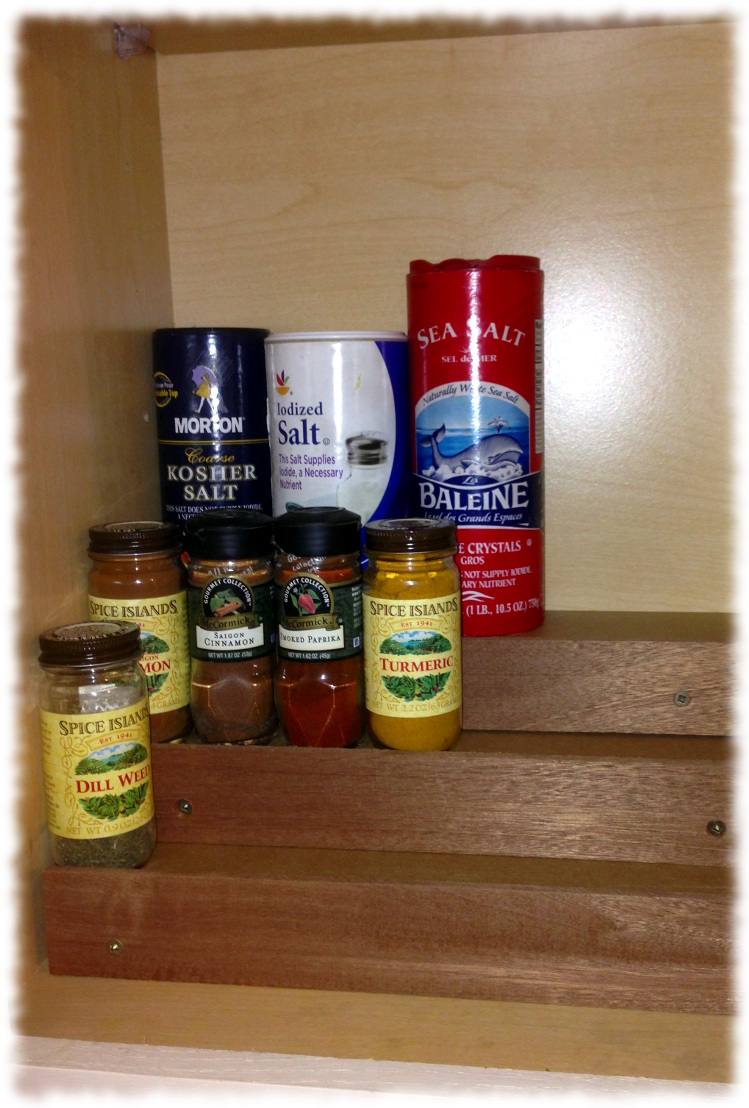
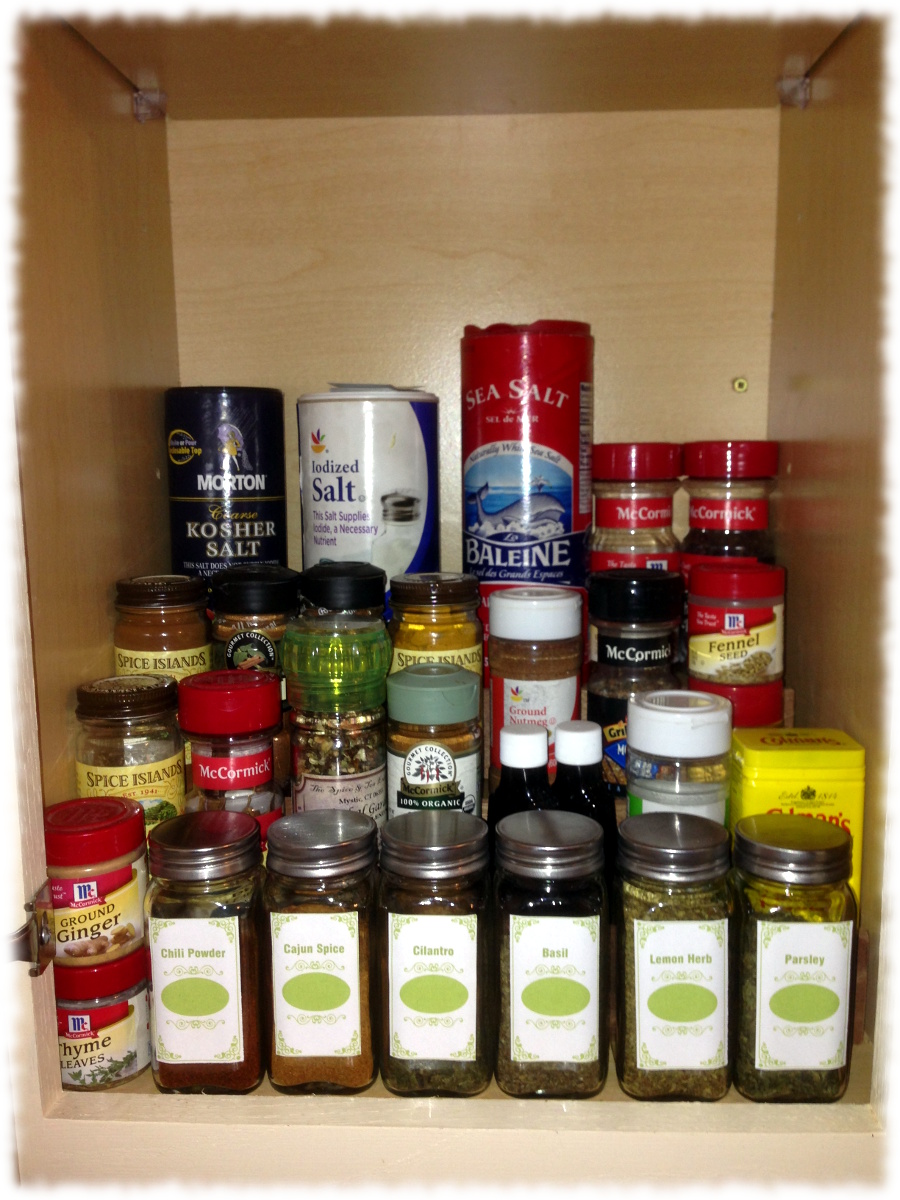
Today I decided to make a quick spice rack. We have been keeping our spices on the bottom shelf of one of the kitchen cabinets next to the stove. It was a pain to find spices – they were a disorganized mess and one had to dig around lifting up bottles to find the desired spices. I had a few pieces of good plywood lying around, and all we needed was some steps in the cabinet to allow us to find the spices in the back. It took about an hour to cut the pieces to size and mill some sapele for the front edge of the rack. I couldn’t find my wood glue to attach the front edging, so I attached the front with a pair of screws. Anyway, the steps will be hidden underneath the spice bottles when it is filled in. The only reason I chose sapele was that I had two smaller pieces in the workshop and I didn’t feel like going out and pulling out something less expensive. And sapele isn’t really that expensive anyway.
And tonight, instead of cleaning up the workshop, I decided to write in my blog and push cleaning off for another day.
Spice rack installed. The back step is 4″ deep for larger bottles. The front two are about 2″ deep, with about 2″ in front of the rack for a final row of bottles.Spice rack complete with spices.
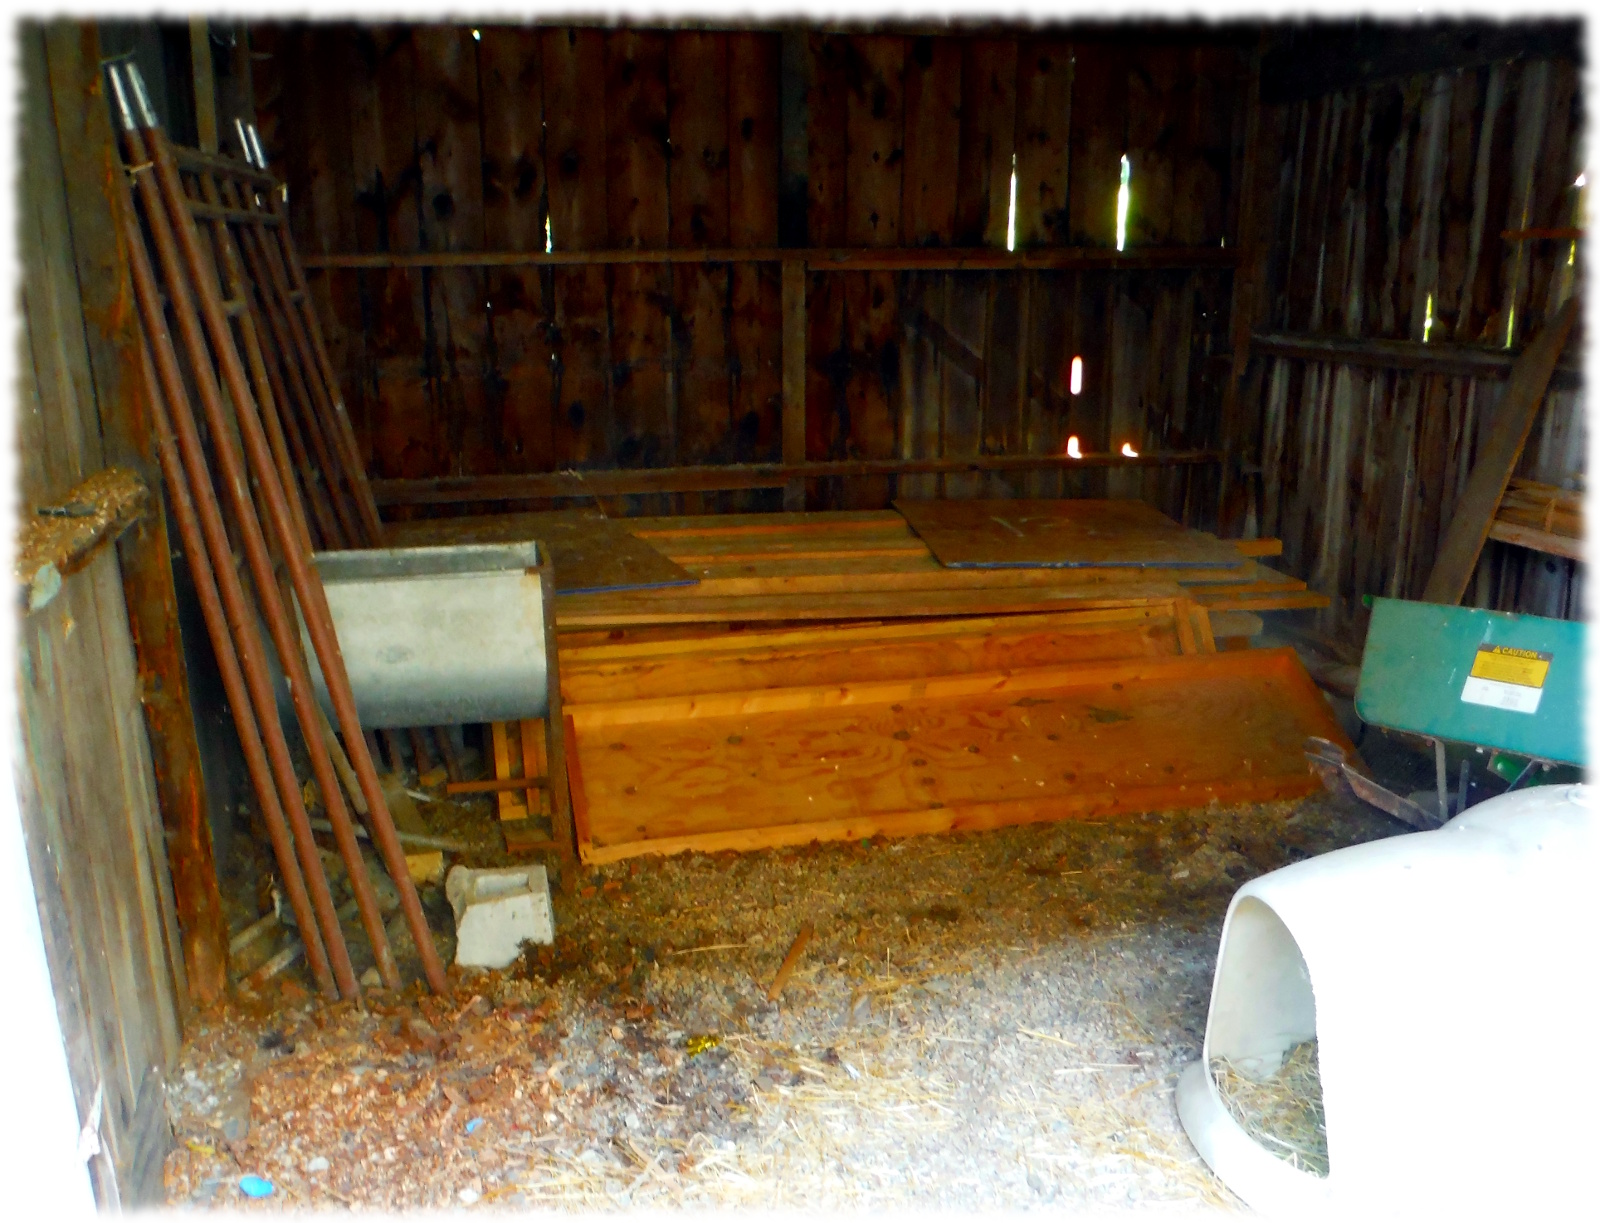
The lumber pile/junk storage/dog pen prior to reorganization.
The last bay of the garage/carriage house is a large, unpaved area. For a long time it just served as an overflow storage area and nesting place for a large group of house sparrows. I had added a gate to the opening so it doubled as a dog pen (in the summer). In the back of the bay I stacked a nice pile of red oak, hickory and maple to air dry. The wood pile wound up being a nice place for Tucker to sit when he got bored staring out the gate and a real pain in the a$$ when I wanted to get a board that was at the bottom of the pile.
A friend of mine is cutting up a large maple tree into slabs and needs a place to air-dry the wood for a couple of months before turning it over to a kiln. We have lots of room, if I just reorganized our stuff a bit. And I just really needed an excuse to build a lumber rack.
I had picked up boards cut from a single oak tree in Ledyard a couple of years ago, and they have been drying in the pile since then. All the other lumber was older and dry. So I could build a proper lumber rack and not worry about keeping the stickers between the rows of boards. Saturday night I headed to the home center and picked up a bunch of construction lumber to build a storage rack.
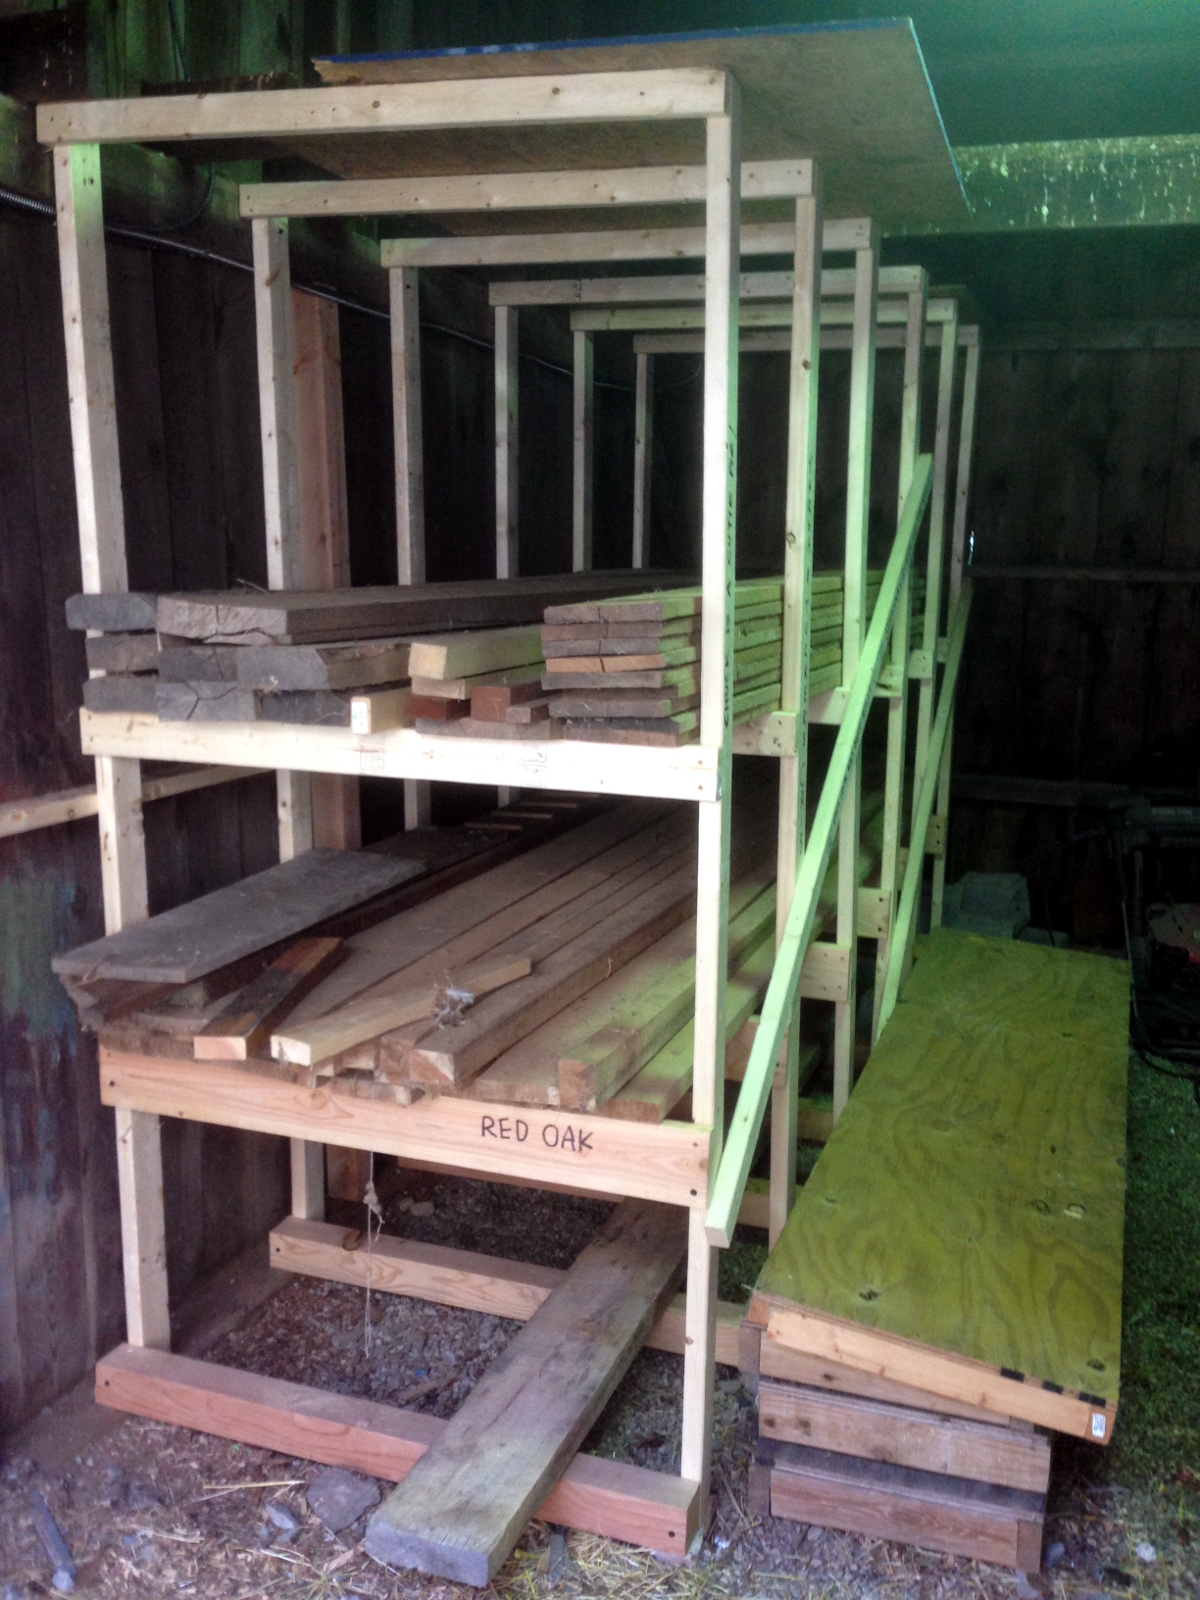
The lumber rack with most of the wood from the pile stacked on. I have lots of room for additional shelves (to be added one of these days).
Sunday I emptied the barn and started building the rack. Of course, I found one of the posts for the barn had rotted, so I had a little project detour to replace that. But it wouldn’t be a good project without a few detours. I had the rack mostly finished by that afternoon.
Yesterday I added the second row of shelving and stacked the remaining lumber from the pile on the shelf. The boys helped me clean and organize the rest of the space. The next step will be to double up some of the 2x4s on the supports and add an additional shelf or two to help keep the lumber organized.
Today the boys helped carry up a few boards that didn’t fit on the lumber rack under the workshop and were just stacked down there. Okay, I have two lumber racks. I have a problem. I know. I have too much lumber. Of course, if you have a good deal… I’m always looking for more. I wouldn’t want to run out in the middle of a project.
But of course I have plans for the lumber. Though I’m sure I’ll never get around to it all:
Hickory: I have a bunch of heavy 8/4 boards that would make a nice workbench even though hickory is a pain to work with and the beams are heavy and a pain to move around. And I already have a functioning antique workbench. But it seems that making a workbench is sort of rite of passage.
Red Oak: I have a matched set of boards from a single tree. I was going to make bedroom furniture from it until Susanna said she likes cherry better than oak. So it will be used to make the boys furniture (and I already made night stands for them from some of it). I also have some random non-matched boards floating around. Red oak is way too common here and is usually used just for firewood (it is like it grows on trees almost).
Cherry: I have a bunch of cherry that Susanna and I picked up on a road trip to Western Massachusetts a couple of years ago. The cherry is for furniture for us and the house. Anyway, cherry is nicer to work with than oak.
Maple: I have maybe 8 boards left that a friend had gotten cheap on Craigslist before he decided that he had too many hobbies to continue making furniture. It is pretty nice spalted maple. I think the boys are going to claim a couple of boards to make Japanese toolboxes this month.
White Oak: A bunch of 8/4 and thicker boards. Okay, I don’t really know what I’m going to do with it. But white oak is strong and rot resistant, so it may go to outdoor projects.
Sapele: A few remaining boards from a stack that had gone to smaller projects and trim on the sailboat.
Cedar: A bunch of smaller boards that I really have no idea what to do with.
Some random other species: Mahogany (though the plank I have isn’t really mine, I just store it and look at it), Yellowheart, Fir, and I’m sure a few more. The boys keep taking the smaller pieces of wood and re-purposing them into swords and leaving the swords outside until they are no longer usable and become firewood and they need to make new swords.
After reading my post about my experiences buying a cruising sail for the O’day 22 online, Judy Blumhorst of Hyde Sails Direct offered to provide her perspective on purchasing cruising sails online. I think that it is a good summary of what I found through my searches online for information when I was researching new sails.
How to Buy Cruising Sails Online
Understanding the basics
of Sail Design, sail cloth & construction
By Judy Blumhorst, June 2015
One of the biggest expenditures a recreational or cruising sailor ever faces is replacing their sails. As the owner of an online loft (www.HydeSailsDirect.com), I know that cost and longevity are the biggest concerns of most customers buying new sails.
The cheapest sails, however, aren’t always the best value over the long-term. They don’t hold their shape for very long and will need to be replaced much sooner.
Understanding the basics of sail design, sail construction and sail cloth engineering will help you get the most bang for your sail-budget buck, and keep the wool from being pulled over your eyes by unscrupulous online lofts.
Q: When do I need new sails?
A: When your sails were new, your sailmaker designed an ideal shape for your boat and your rig, the type of sailing you enjoy, and your local conditions. Over time your sail cloth deteriorated, and the sail lost the shape your sailmaker intended it to have. The loss of shape makes your boat harder to sail and reduces your sailing enjoyment. When your boat won’t point as well as it used to, heels more than it used to and is harder to control, it’s time for new sails.
Even though your sails may not have any tears or rips, you will enjoy sailing much more if you replace your sails when the original shape is lost.
Q: Why is good sail shape important?
A: Obviously good sail shape is important for racing, but increasingly cruisers are realizing the benefits of good shape. Good sail shape translates into less heeling, better pointing, easier boat handling, and the ability to handle higher winds comfortably.
Q: What difference does the sailcloth make to me?
A: High quality, name brand sailcloth has low stretch, holds its shape for a long time, and is durable so it has a long, useful service life. Sails that are made from low quality Dacron last a long time without ripping, but they lose their shape quickly.
Q: Woven Dacron or Laminate? What is the Difference?
A: Since the 1950’s, woven polyester (Dacron) has been the most popular material for cruising sails. Over time, boats grew larger and cruisers demanded better performance from their cruising boats. Sailmakers and cloth manufacturers needed improved fabrics that could resist higher loads and retain their shape better.
In the 1960’s and 1970, laminate sailcloths were invented to fill the need for better shape-holding. The early laminates were plagued by durability problems, and didn’t last very long. Laminates and Woven sailcloth have come a long way since then. Today, modern laminated sailcloth is more durable than the old laminates.
Laminates are made by gluing layers of different materials together to form a sandwich. Basic laminates consist of two layers of plastic film sandwiched around load-bearing yarns. The fibers are carbon, Spectra/Dyneema, Twaron, Technora, Kevlar, Pentax and polyester. For cruising laminates, an additional layer of polyester is laminated on the outside to improve the fabric’s resistance to UV, tears and abrasion. Generally speaking of durability, most sailmakers assume that three to five years of frequent use is a reasonable lifespan for laminated cruising sails. With less frequent use, cruising laminates will last longer.
Today, highly advanced woven Dacrons can carry much greater loads with less stretching. The most advanced Dacron sails hold their shape as well as cruising laminates and last longer.
In the past 10 or 15 years, Challenge Sailcloth developed a Dacron named Warp Drive for use in radial-panel sails that holds its shape as well as most cruising laminates. Contender Sailcloth and Dimension Polyant Sailcloth invented high-tech ways to blend polyester, Vectran, and Spectra/Dymeema yarns together into hybrid woven Dacron. (Challenge Sailcloth makes Hood Vekton , Contender Sailcloth offers “Hybrid Fibercon” and Dimension Polyant offers “HydraNet Radial”).
Q: Why are the new radial woven fabrics so important for cruisers?
A: Woven Tri-Radial cloths are a big deal because they let sailmakers design and build tri-radial sails in woven cloth. Dacron is still the most durable fabric in absolute terms. Tri-radial construction deforms less under loads. Tri-Radial sails of Dacron have excellent shape retention and excellent durability. That’s a powerful combination for long-term performance and long-term affordability – a lot of “bang for the buck” for cruisers.
Sailmakers orient the panels to resist all the loads better and retain shape over time better, compared to cross-cut sails. Dacron Tri-radial sails offer owners excellent durability for long service life as well as excellent shape life, at a price that would have been inconceivably low in past years.
One important point to remember if you are buying a new sail is that the cloth used for a tri-radial sail and the sailcloth used in a crosscut sail are not interchangeable. Modern woven cloth for tri-radial construction is considerably more expensive than sailcloth for cross-cut sails. Name brands are Challenge Warp Drive ($$), Contender Hybrid with dyneema ($$$) and HydraNet Radial with dyneema ($$$$).
Q: Who manufactures the best Woven Sailcloth?
A: In the United States and abroad, four major suppliers of sailcloth—Dimension Polyant, Bainbridge International, Challenge Sailcloth, and Contender Sailcloth—provide sailmakers with Dacron, Dacron blends, and laminate cloths and related materials to build strong, state-of-the-art headsails and mainsails.
Q: WHY ARE THERE SO many different Dacrons?
A: There are many reasons for the multitude of cloth styles and prices.
Sailcloth manufacturers build cloths to meet a wide range of price points, from budget to premium.
Sailcloth engineers design dozens of different types of cloth so the sailmaker can choose the best cloth that will have the best shape under load.
Q Why do some Dacrons cost much more than another? Aren’t they all the same.
A: The more expensive Dacrons generally stretch less. They cost more because the raw materials cost more, the technology is more complicated, and they take longer to weave. Also, cloth manufacturers can demand a higher price because low stretch Dacron makes a better sail.
However, economies of scale during production greatly affect the price of sail cloth. Popular cloths which are produced in greater quantities cost less.
Also, production lofts that buy in massive quantities get lower prices from the manufacturer, and save on transportation costs too.
Q I’m a Cruiser, not a racer. What is the best value in sails for Cruisers?
A: As a sailmaker, customers frequently tell me that they want to buy the least expensive sails I sell because “I’m not a racer. I don’t need fancy sails”. I think that’s the wrong perspective to have when you’re buying sails. The less expensive sails don’t retain their shape as long as better quality ones. You will have to replace the sails sooner because your boat sails poorly sooner
Here’s a better way to look at it: In general, you should buy sails made of the lowest stretch cloth you can afford. The only time this doesn’t apply is when you are going to sell the boat within one or two seasons. All things being equal, the less expensive fabrics don’t hold their shape as long as the more expensive ones. When your sails have lost their designed shape, it’s time to replace it — even if it hasn’t ripped.
Q: I’m on a budget. What cruising sails should I buy if I can’t afford the “best Dacron”?
A: The answer is the same as before: Buy the lowest stretch Dacron that you can afford! It will give you several years of good service. But in the long term, you will need to replace them sooner than the less expensive Dacron.
Q What should I tell my sailmaker when I’m buying new sails?
A: I’m sorry, but that’s a trick question! You can tell your sailmaker whatever you like, but it’s the sailmaker’s responsibility, not yours, to get all the important information necessary to select the right sail for your needs. At the least, the sailmaker should interview you to find out the following important needs:
Your sailing experience and level of skill
Your expectations about performance
Your expectation about durability
Your expectations about ease of use (Are you willing to “baby” the sail or are you more casual about how you treat your sails?)
Your time horizon for using the sails
Your sailing style (eg race vs cruise, set-and-forget cruiser vs string-pulling-trimming cruiser)
Budget
Miles/hours sailed per year,
Climate (humidity, UV)
Wind range and sea state on your cruising grounds.
Q: How do I avoid “getting the wool pulled over my eyes”
Unfortunately, there are a scam artists on the internet who sell inferior products, misrepresent the goods or use counterfeit imitations of name brand cloth. I have personally examined sails that were made of a less expensive, inferior Dacron sail cloth than promised. Those owners told me their horror stories when they hired me to be their sailmaker after being ripped off by a dishonest online loft.
It’s particularly easy to scam people buying new sails because the average sailor can’t tell the difference between cheap sailcloth and expensive sailcloth once the sail has been delivered. The crook substitutes cheap cloth for expensive cloth and pockets the difference. The substitution isn’t obvious for a year or longer, when the shape of the sail deteriorates rapidly. By then, it’s too late for the buyer to do much about it.
Ultimately, the most important factor in choosing your sailmaker is their reputation. Make sure you carefully check the reputation when you hire an online loft.
Do some research online about the firm. Check the Better Business Bureau and Google. There are very few complaints online about honest and competent sailmakers.
If you discover numerous complaints about quality or service during your online research, don’t buy from that business. As the saying goes “Where there’s smoke, there’s usually fire”.
Do some comparison shopping, but don’t be seduced by super low prices. There are several well established online sailmaker lofts with good reputations on Google. If a small non-name brand loft claims to be able to sell the same sail for 30% less than the other online lofts, exercise extreme caution. If the price at one online loft “is too good to be true” be very, very cautious. Don’t let the promise of a low price cloud your judgement.
Get the name of the person advising you on cloth selection online and check his sailing resume online.
Get the name of the person designing your sail and check his sailing resume online.
Get the name and physical address of the loft building your sails. Honest lofts don’t hide where their sails are built.
CAUTION IF YOU ARE BUYING SAILS ONLINE: The cost of the cloth is the biggest factor in the price. Protect yourself against a “bait and switch” on the cloth. Insist that the invoice shows the brand name and manufacturer’s style number of the cloth in writing. A weight designation is not a style or part number. Don’t accept vague descriptions that don’t include the style or part number!
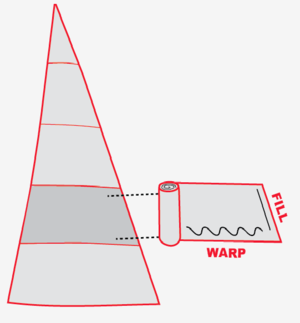
Challenge makes two versions of many of its super-premium & premium woven dacrons: High Aspect and Low Aspect. They engineer different constructions to align the strength of the fibers with the load direction of the sail. One is not better than the other. They are both engineered for a specific application.
Loads on High Aspect Sails
Loads on High Aspect Sails
A high aspect sail is tall and narrow. By definition, the luff is at least 2.9 times as long the foot.
It generates the most load along the leech. A High Aspect cloth generally has larger fill yarns and is very strong in the fill direction. The warp yarns almost touch each other in the weave, creating tunnels in the construction which keeps the fill yarns geometrically straight and low stretch.
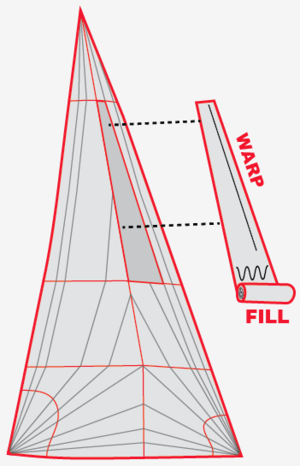
Loads on Low Aspect sails
Loads on a Low Aspect Sail
A Low Aspect Sail is short and wide. By definition, the luff is less than 2.9 times the length of the foot. The loading directions are not parallel, and run more toward the center of the sail.
Low Aspect cloths generally have larger warp yarns than in a high aspect fabric, and while the fill yarn is bigger than the warp yarn, they are closer to equal size than in a High Aspect Cloth.
There is more even crimp between the two fibers. The even crimp allows the yarns to grab each other, thus creating a strong resistance to bias stretch.
Understanding How Panels for Sails Are Cut
Aligning loads with Low-Stretch Yarns
CrossCut Sails
Cross Cut Sail
Crosscut sails have long panels that go horizontally across the sail, perpendicular to the leech and the heaviest loads on the sail. The yarns that go the length of the cloth are called fill yarns. The warp yarns, which cross at 90 degrees, are woven over and under the straight fill yarns. The technical term for bending the yarn is called “crimping”.
For crosscut sail panels, yarns in the fill direction have minimal stretch because they are relatively straight. The yarns in the warp direction are comparatively stretchy because they are crimped.
Tri-Radial Sails
Tri-Radial Cut Sail
Tri-Radial sail panels align the straight warp yarn with the load direction. The panels must be cut parallel to the length, not width, of the sailcloth
The best Dacron cloths for Tri-Radial sails, like Challenge Warp Drive or North’s Radian, have zero crimp in the warp yarns. Challenge Warp Drive costs 200-300% as much as entry level Dacron for CrossCut Sails because it is very time-consuming to weave and produced in lower quantities than crosscut Dacron.
Designers cannot use fill oriented cloth to cut panels for tri-radial sails. If you do, the loads are being carried by the heavily crimped fill threads, and the cloth will stretch badly.
Beware of “knock-off” Tri-Radial Dacron sails at unbelievably low prices. Dishonest sail lofts sometimes use ordinary inexpensive fill-oriented Dacron to build Tri-Radial Sails and pass it off as Warp Drive. They get away with it because most buyers can’t feel or see the difference. The highly-crimped yarns are too stretchy to resist the loads in the sail, and the sail will stretch out of shape very quickly.
——————
Portions of the post above were reproduced or borrow heavily with permission from Challenge Sailcloth http://www.challengesailcloth.com
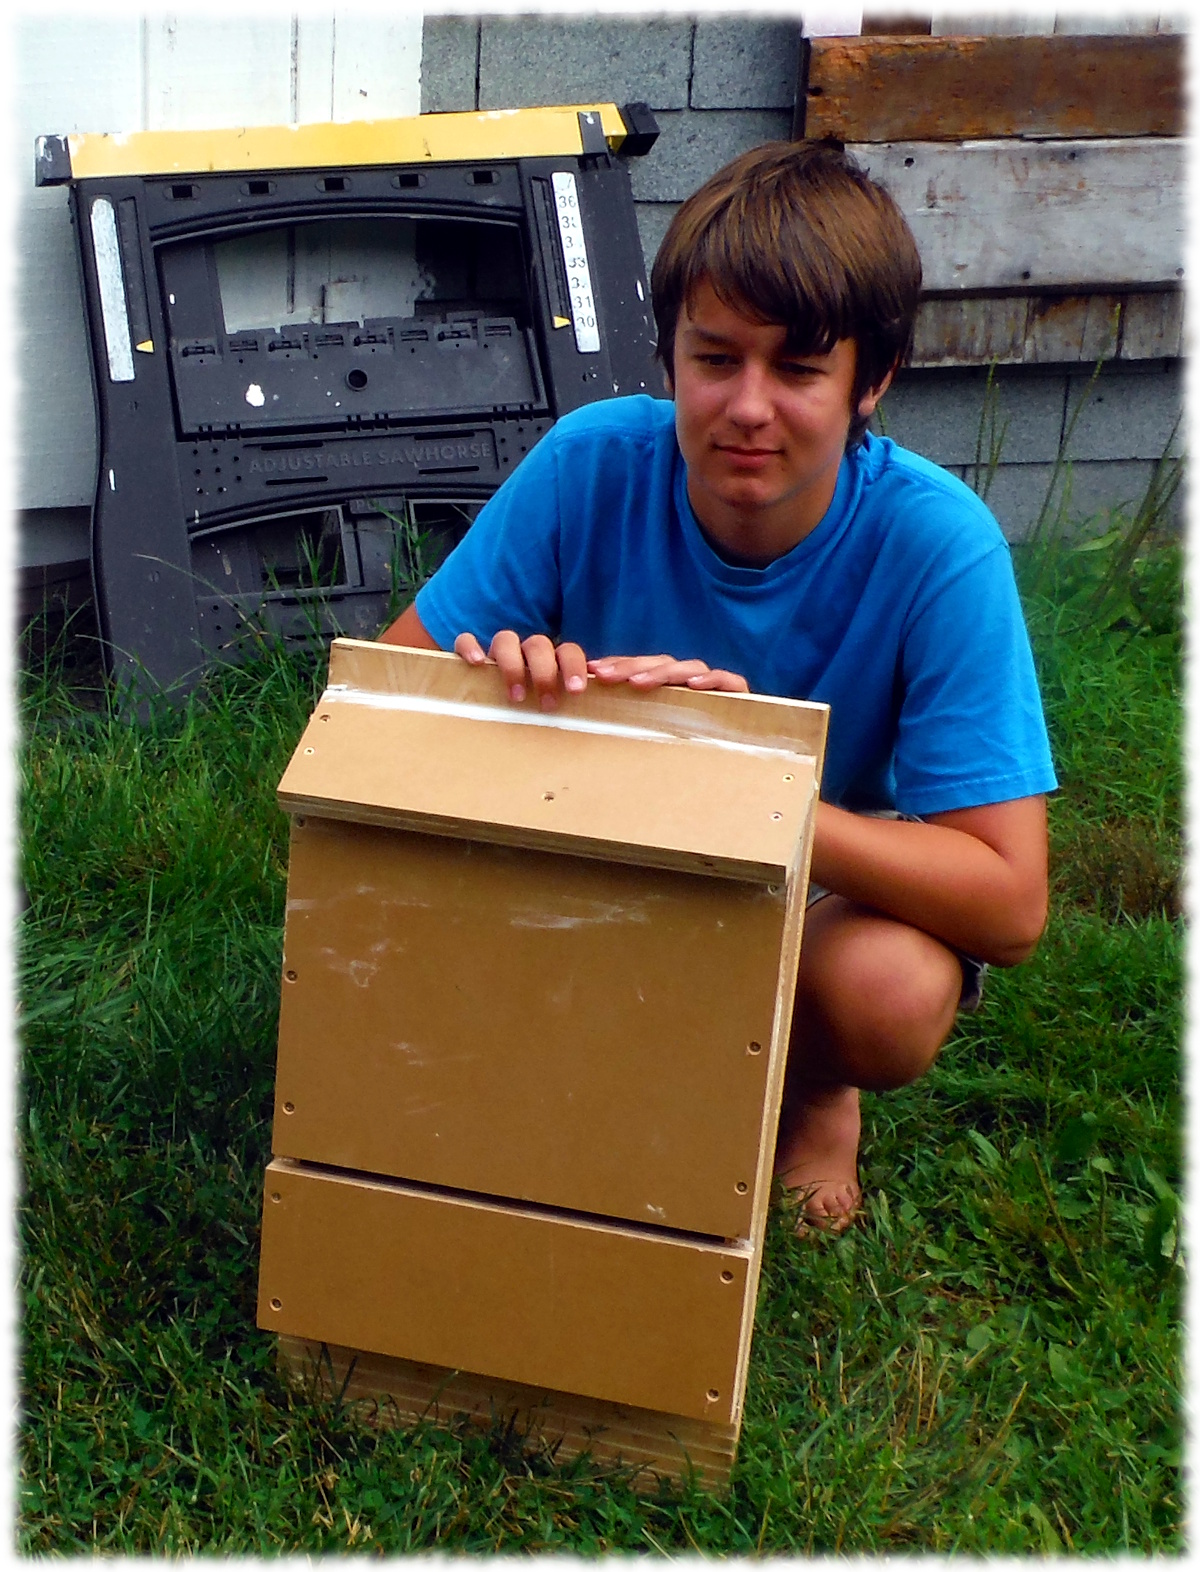
I had been talking to Will about projects he would find fun to do in the workshop. He said that he thought building a bat house would be fun. Today he had is friend, Morgan, over and the two of them built bat houses (one for her house, and one for here).
The project was quick and made from 3/4 plywood (and MDO) scraps I had lying around. The real pain will be hanging it way above the chicken coop after it has been painted. We had initially planned on going sailing today, but the weather didn’t support it.
Will and completed bat house. Once the caulk dries, we will paint it and hang it on the garage.
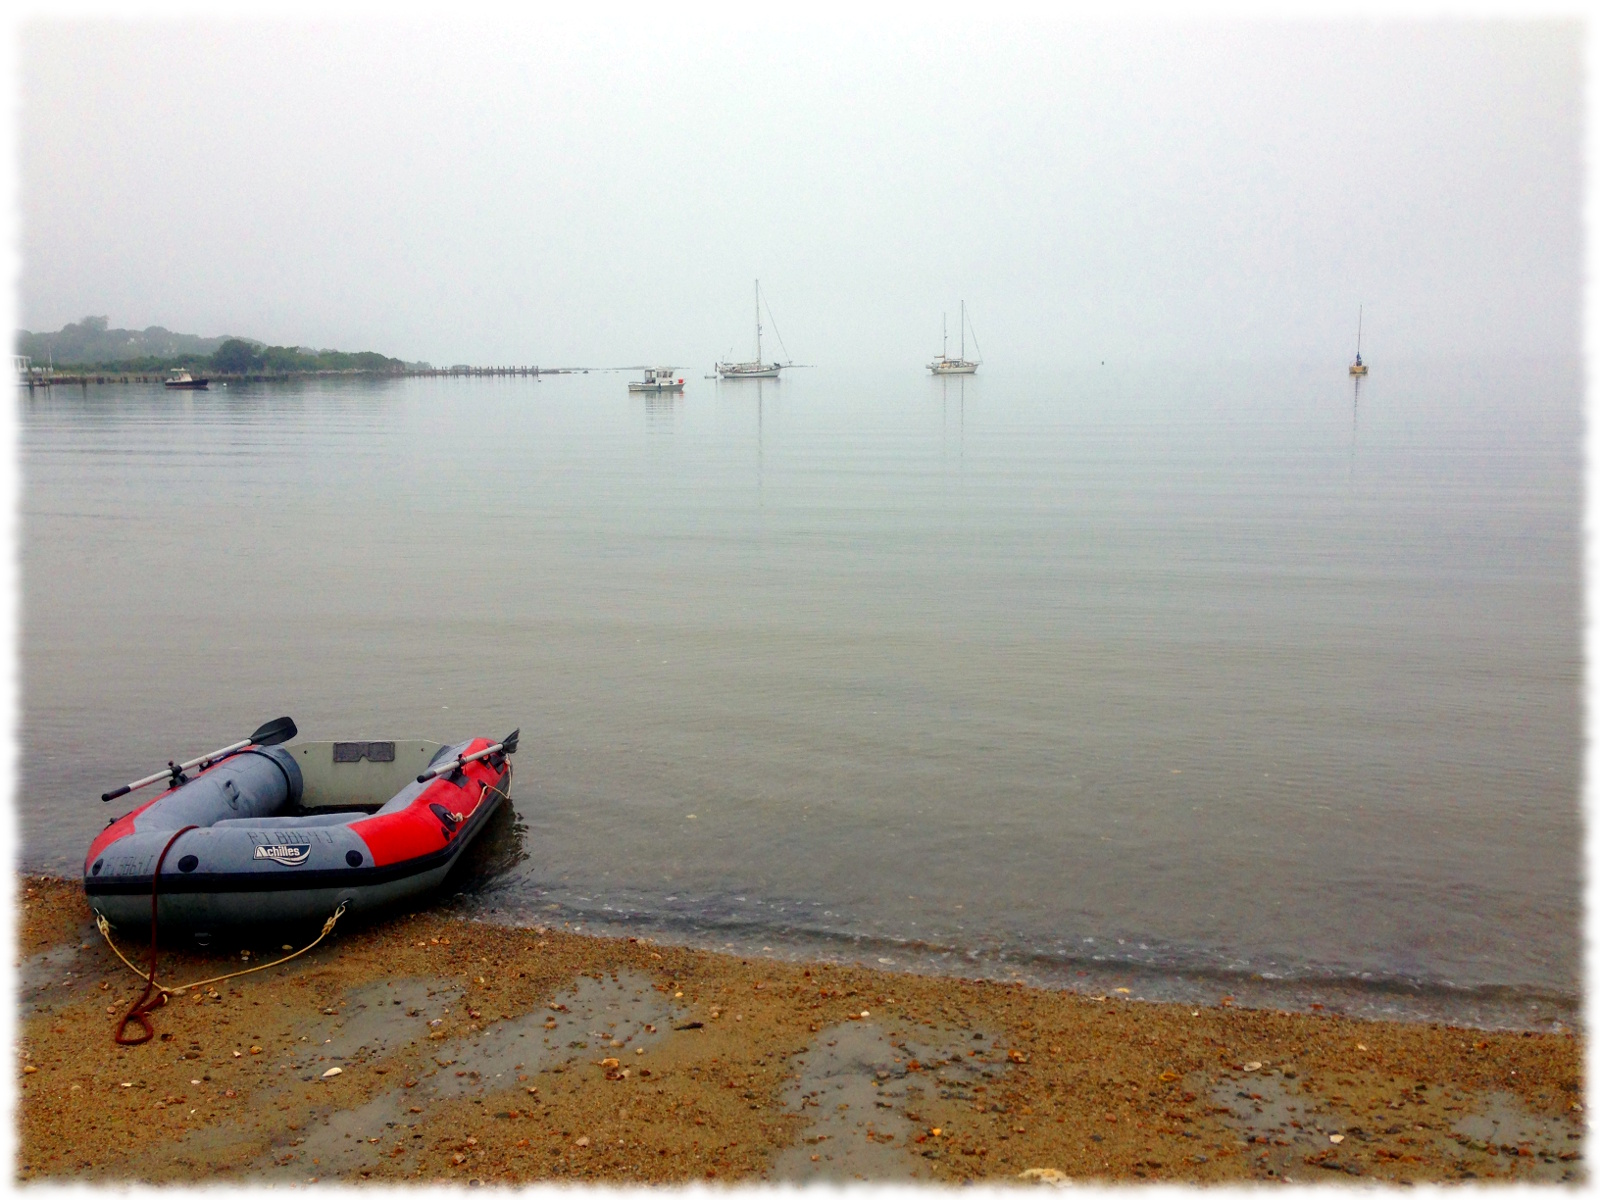
Will came over on Saturday morning to spend the weekend sailing and camping in Long Island Sound. We decided that there was room for Targa to join us, so it was the two of us plus one dog for a trip across the sound. Susanna got to enjoy peace and quiet. Well as much peace and quiet as one can have with Tucker and a bunch of chickens and ducks.
We headed out around noon to catch the ebb tide out of the Niantic river. We had debated going across the sound to Gardiners Bay, but decided that was too long of a trip and too much heading into the wind. We opted to catch a left and head east to Fishers Island sound and find refuge in East Harbor (Fishers Island, NY) for the night.
The wind didn’t pick up until late afternoon, so after heading downriver we motor-sailed east. Will took the helm and I went below to make lunch. Then crunch. We grounded off of Two Trees Island. Nice thing about a shallow draft boat is that isn’t too big of a deal. Except that I got wet. I jumped off and after a few moments, pushed the boat off the gravel. Then the boat drifted towards deep water before I could jump back on. So there I was hanging off the bow of the boat, not quite able to get myself lifted into the boat. Luckily, Will was good in an emergency. He killed the outboard and got the ladder out for me to ungracefully clamber back onboard.
Of course, Will noted that Two Trees Island is a dumb name. There are no trees at all on the island.
The rest of the day went better. The wind picked up and we were able to sail most of the way to East Harbor. It even got to the point as we passed Chocomount Cove that we decided to take the jib down before the wind picked up too much.
We took Targa ashore (the joy of cruising with a dog), and ate a camping dinner of freeze-dried meals. After dinner we took Targa ashore again, and Will decided to spend time swimming at the beach. We got to enjoy an evening of fireworks. First from the submarine base, then from what looked like was Stonington. A cool breeze kept the boat comfortable that night.
The next morning I woke to a foggy stillness. There was no wind, not even a slight breeze. And the fog thickened as the morning stretched on. We ate a breakfast of oatmeal and coffee. I’m sure Will found some cookies and chips to supplement his meal.
We started up the motor and meandered along the Fishers Island coast in the morning fog. We kept close to shore, and luckily the fog started lifting before we entered Long Island Sound, and was completely gone before we had to pass the Thames River mouth.
We made it back to the mooring by noon, with only a short hiccup. The outboard stopped and wouldn’t restart immediately just off of Millstone nuclear power plant. We took the opportunity to drop the anchor and eat lunch. After a few more tries, I got the motor running and we were on our way. We enjoyed the end of the trip with a short swim in the Niantic River at our mooring before heading home.
A foggy morning at East Harbor, Fishers Island, NYWill preparing lunch on Sunday, after deciding that it was better if he cooked and I drove by Two Trees Island (just so we didn’t have to revisit the shallow gravel bar just north of Two Trees Island). Please ignore the disaster int he cabin after a weekend camping in the cramped spaces of an O’Day 22 with at 12-year old and medium sized dog.
I’ve been a little slow to finish posting the pictures from St. Louis. We have had a busy 10 days since we got back from our vacation. Now I need another vacation.
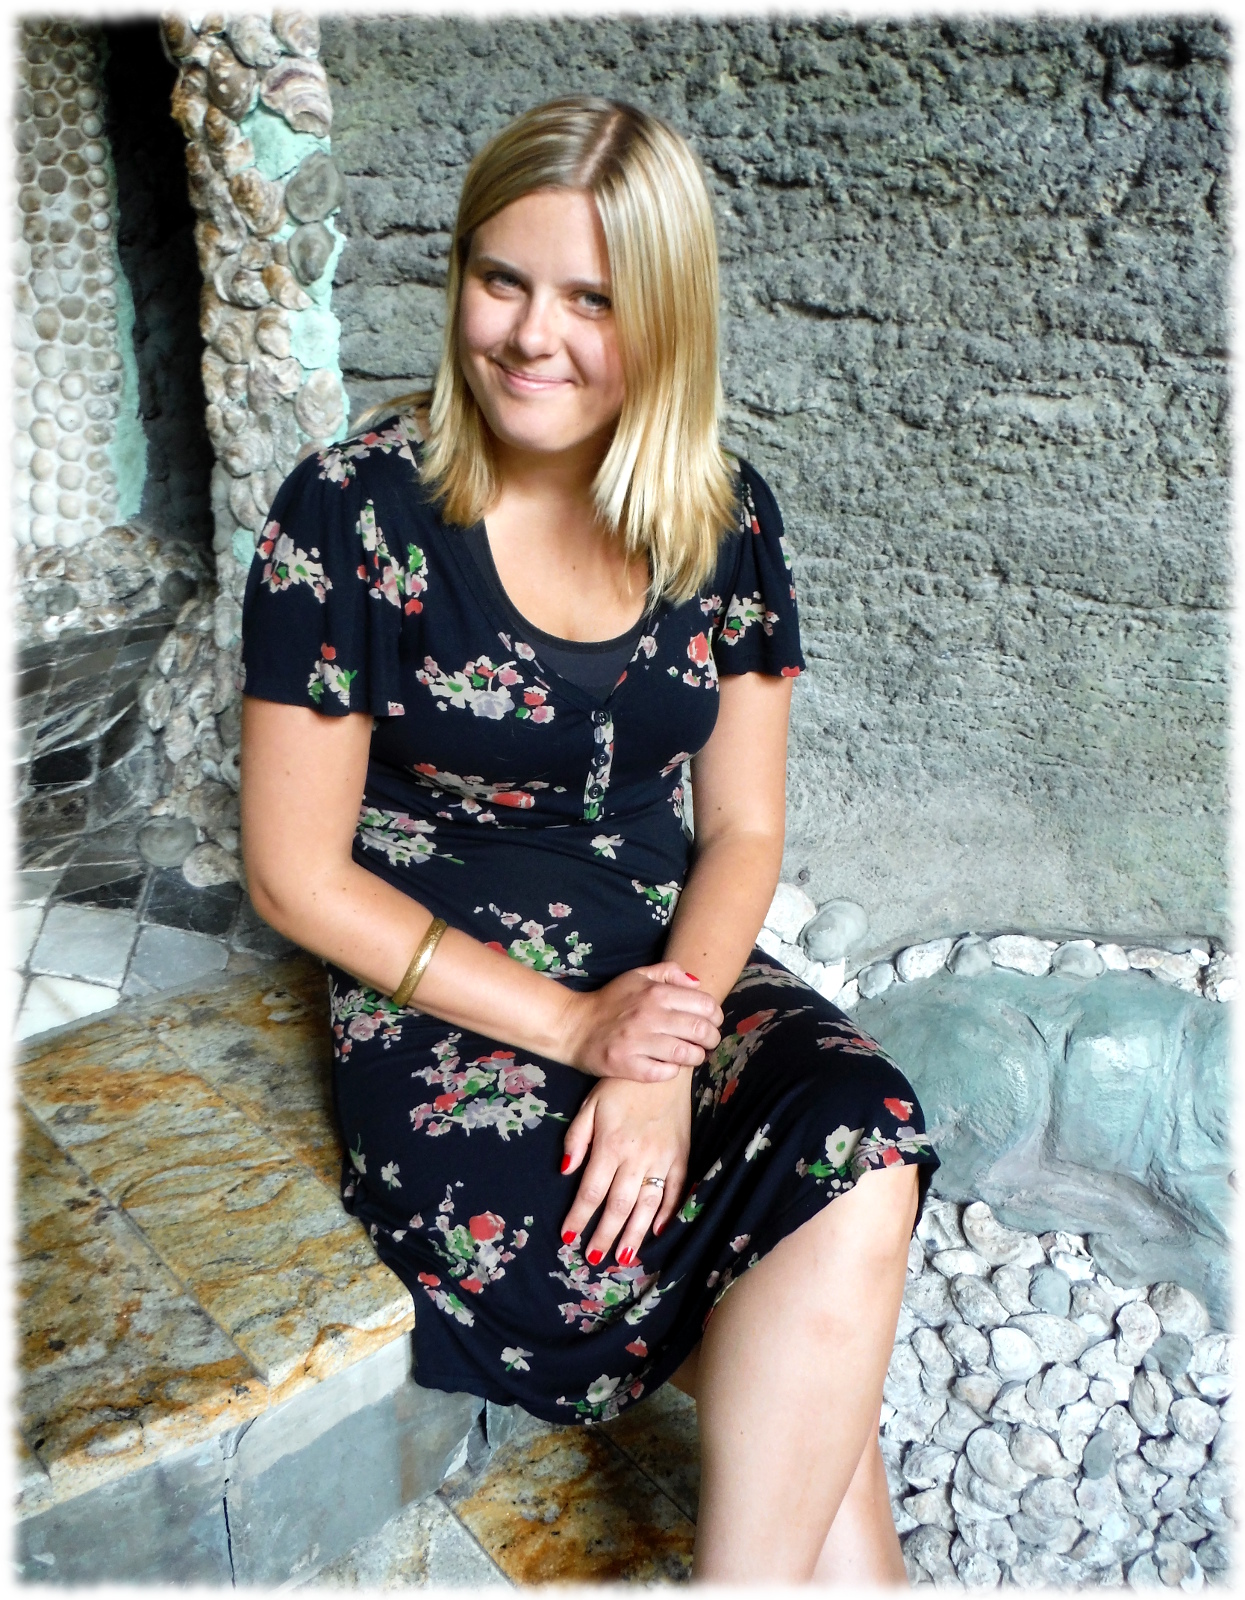
Benjamin exploring the roof of the City Museum. Yes, that is a bus hanging over the edge of the roof. It reminded me that I don’t really like heights.Susanna and Benjamin resting before our tour of Cathedral Cavern.Susanna enjoying the City Museum, St. Louis. Beautiful as always.
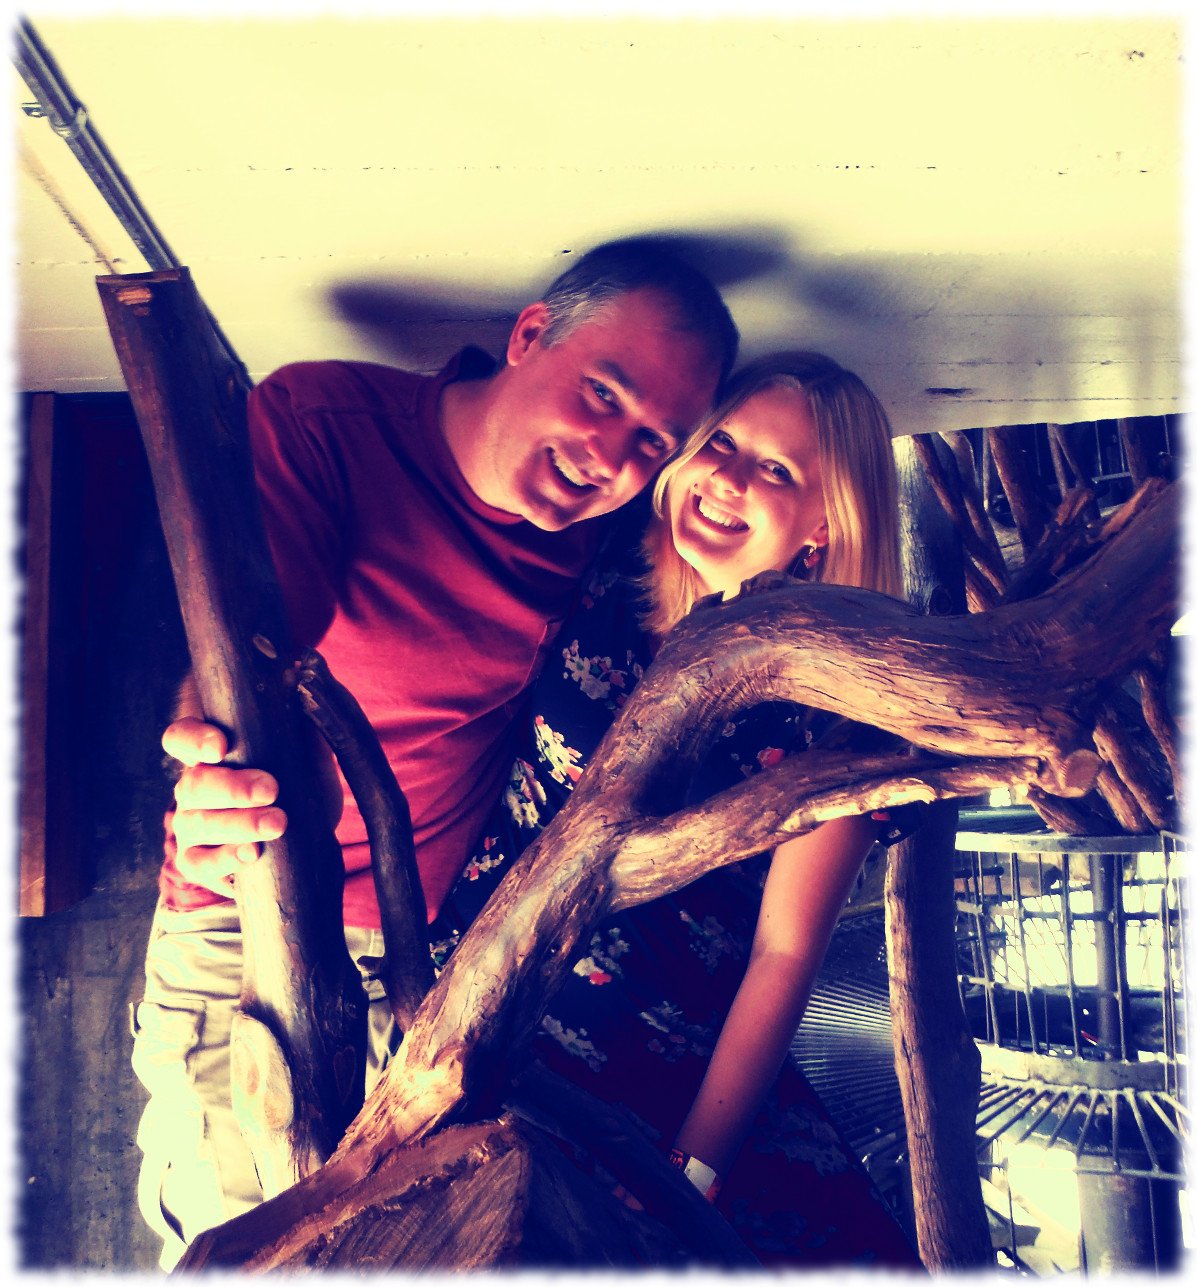
Susanna, the boys, and I are taking a little over a week to drive to St. Louis and visit family. We spent a couple of days in the Ozarks camping in a huge cabin (so not really camping). We spent two days floating on the rivers down there, and even toured a cave (Cathedral Cave). Today we went to the City Museum for the morning, and tonight we will watch fireworks in Webster Groves. Here are some pictures from the trip so far:
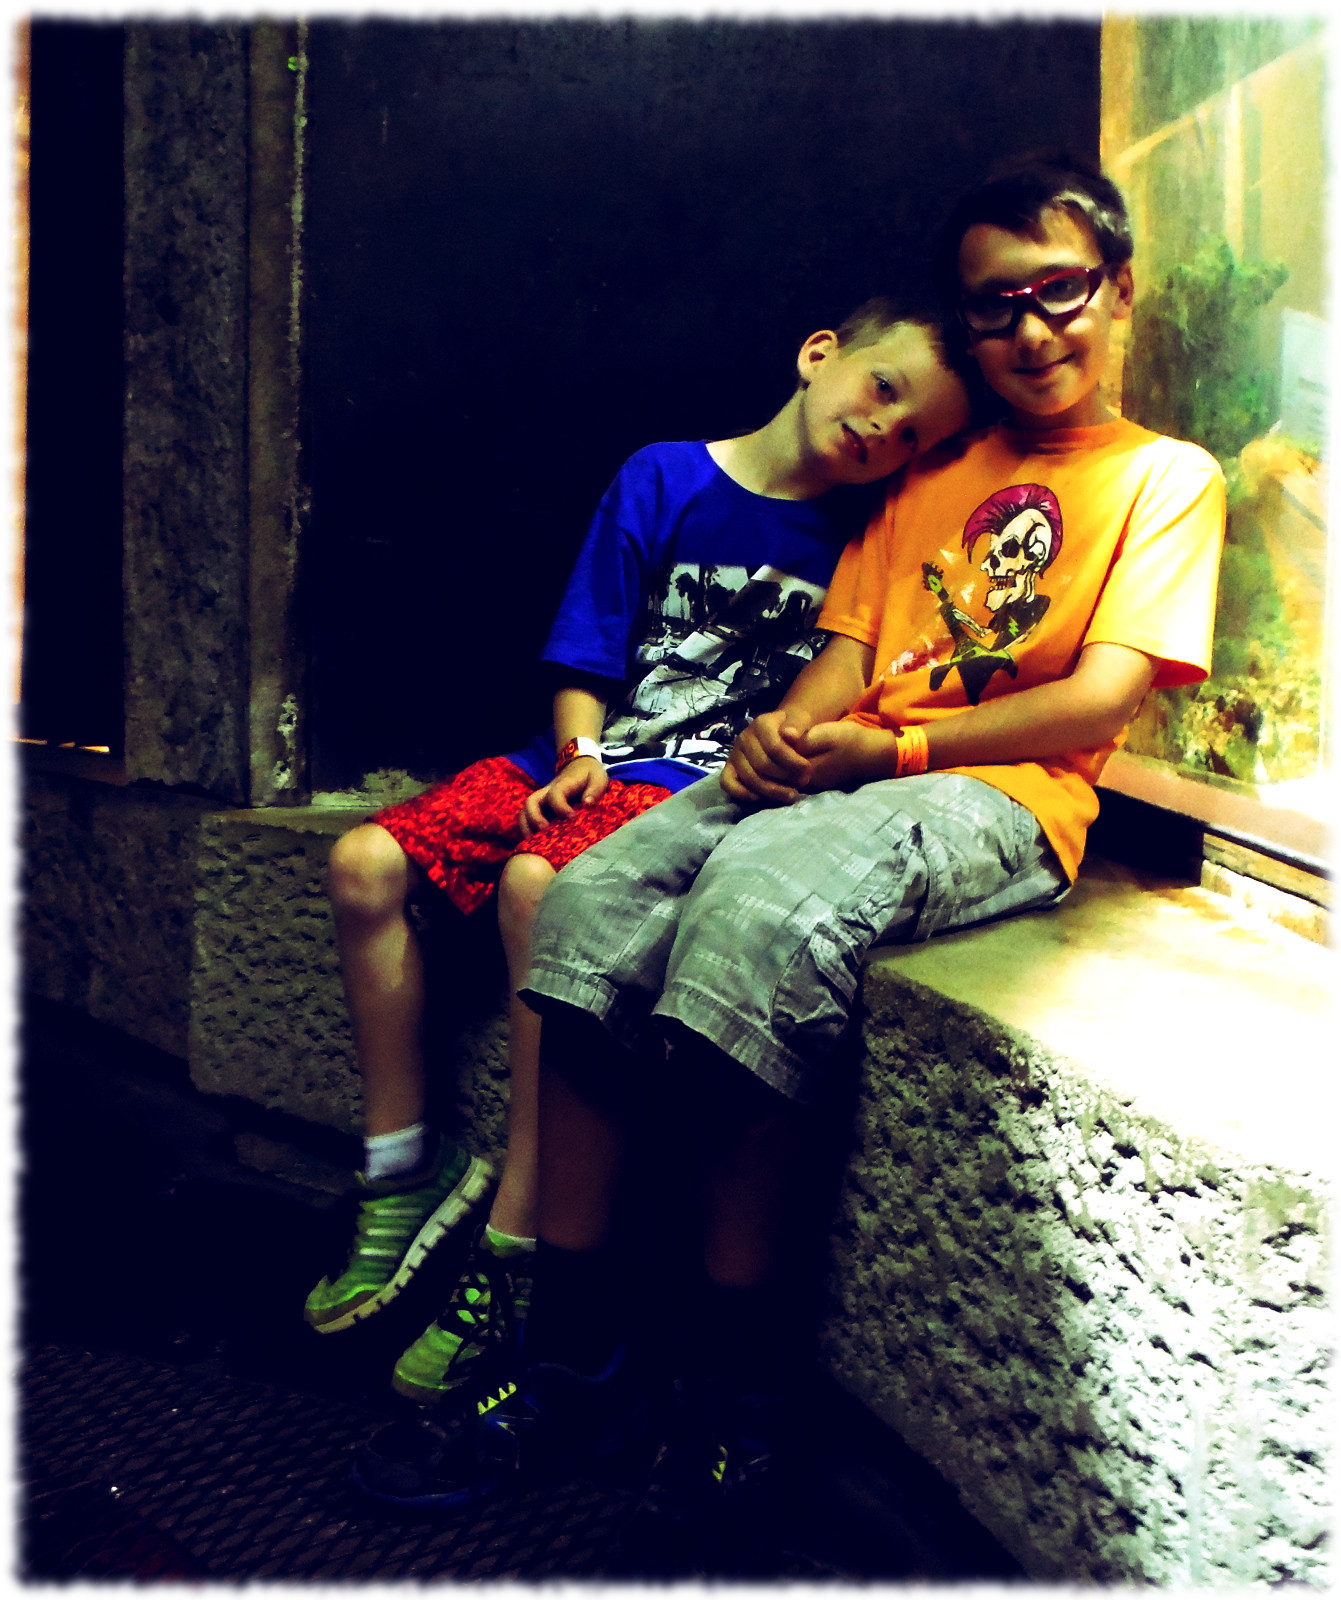
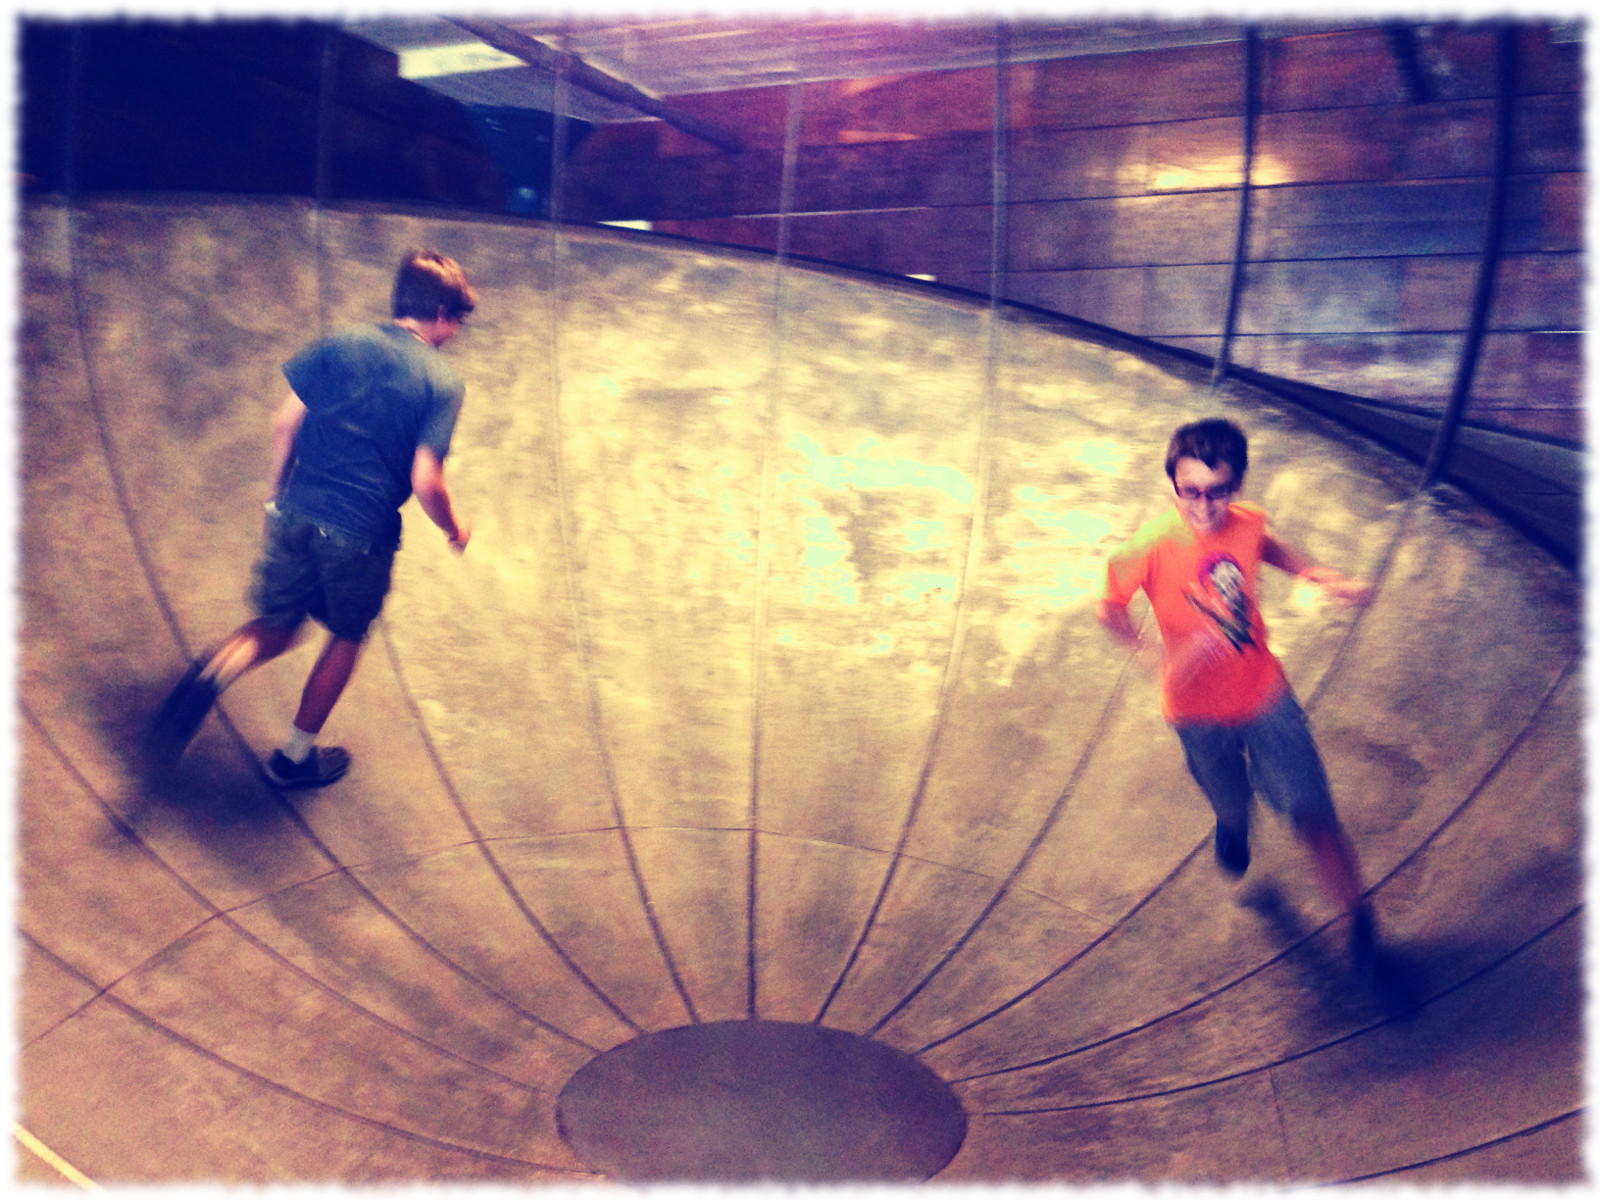
Ben and Brady taking a break at the City MuseumSusanna and my dad at the entrance to the Cathedral Cave.Climbing at the City Museum, St. Louis.The Curtis boys at the City Museum, St. Louis.Exploring the City Museum, St. Louis.Will and Ben in motion (as always). City Museum,St. Louis.