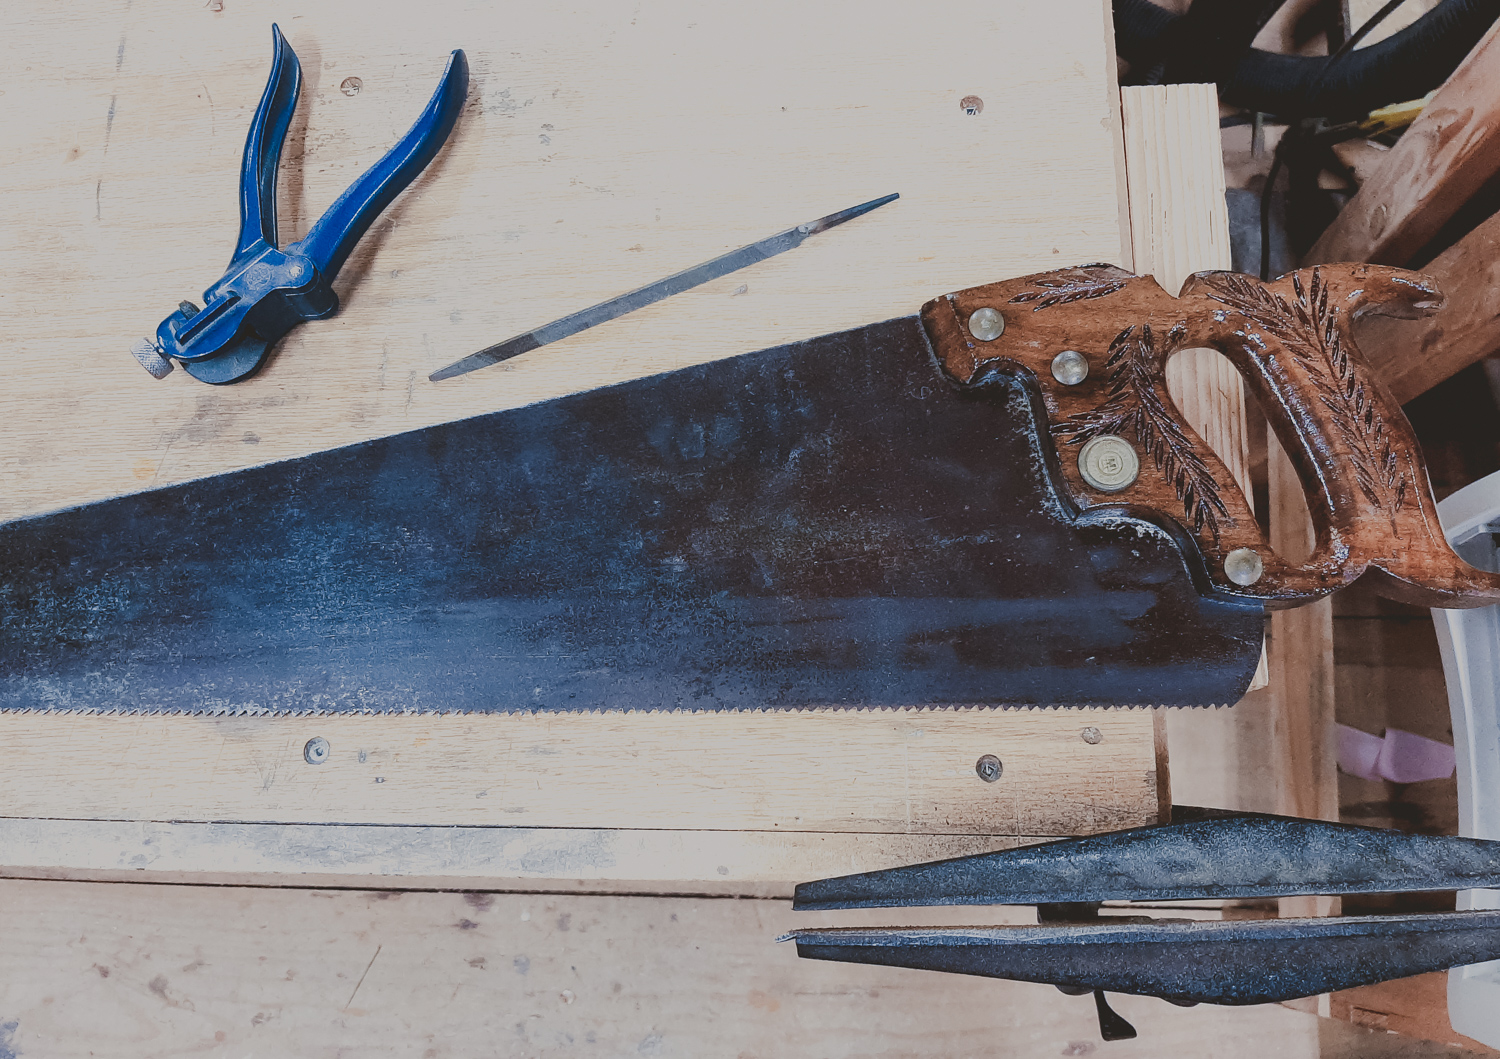
Disston saw cleaned up and ready to use. Saw vice is on the bottom of the picture. File and the saw set are on the top. The vice and saw set have been sitting in a corner of the shop for years.
Last weekend I had to drive to Chaplin, CT to pick up Ben from a friend’s house. Izzy joined me for the drive, on the promise that we would stop by a garage sale if we found one. And we found only one that braved the rain to have a sale. We looked around a bit, and I let Izzy pick up two toys and a book that were being given away for free. I found a rusty Disston panel saw covered in rust for $1 and picked it up.
The medallion on the saw indicates that the saw was made between the wars (1917-1940), at least according to the Online Reference of Disston Saws. This week I took off the handle and cleaned the rust off the blade. I cleaned up hte handle and coated it with spar varnish. Tonight I reassembled the saw, did a quick sharpening, and set the teeth. A quick test cut on some pine, and I have a second fully functional saw for the workshop. I should probably hit the teeth with the file again for one quick finishing pass and try the saw on something harder like oak.
Maybe I should get around to sharpening the 5-6 saws I have hanging on the shop wall for decoration. I also should have taken a picture before I cleaned up the saw.
Winter is pushing into March with a snowfall this afternoon. That on top of the frozen snow from the past month’s snow. We are starting to get a little stir crazy being stuck in the house. It even seems that Minecraft isn’t exciting Will as much today as usual.
Instead of just sitting around, we decided to head out to the flea market this morning. The boys each picked up a pocket knife (to keep in the workshop).
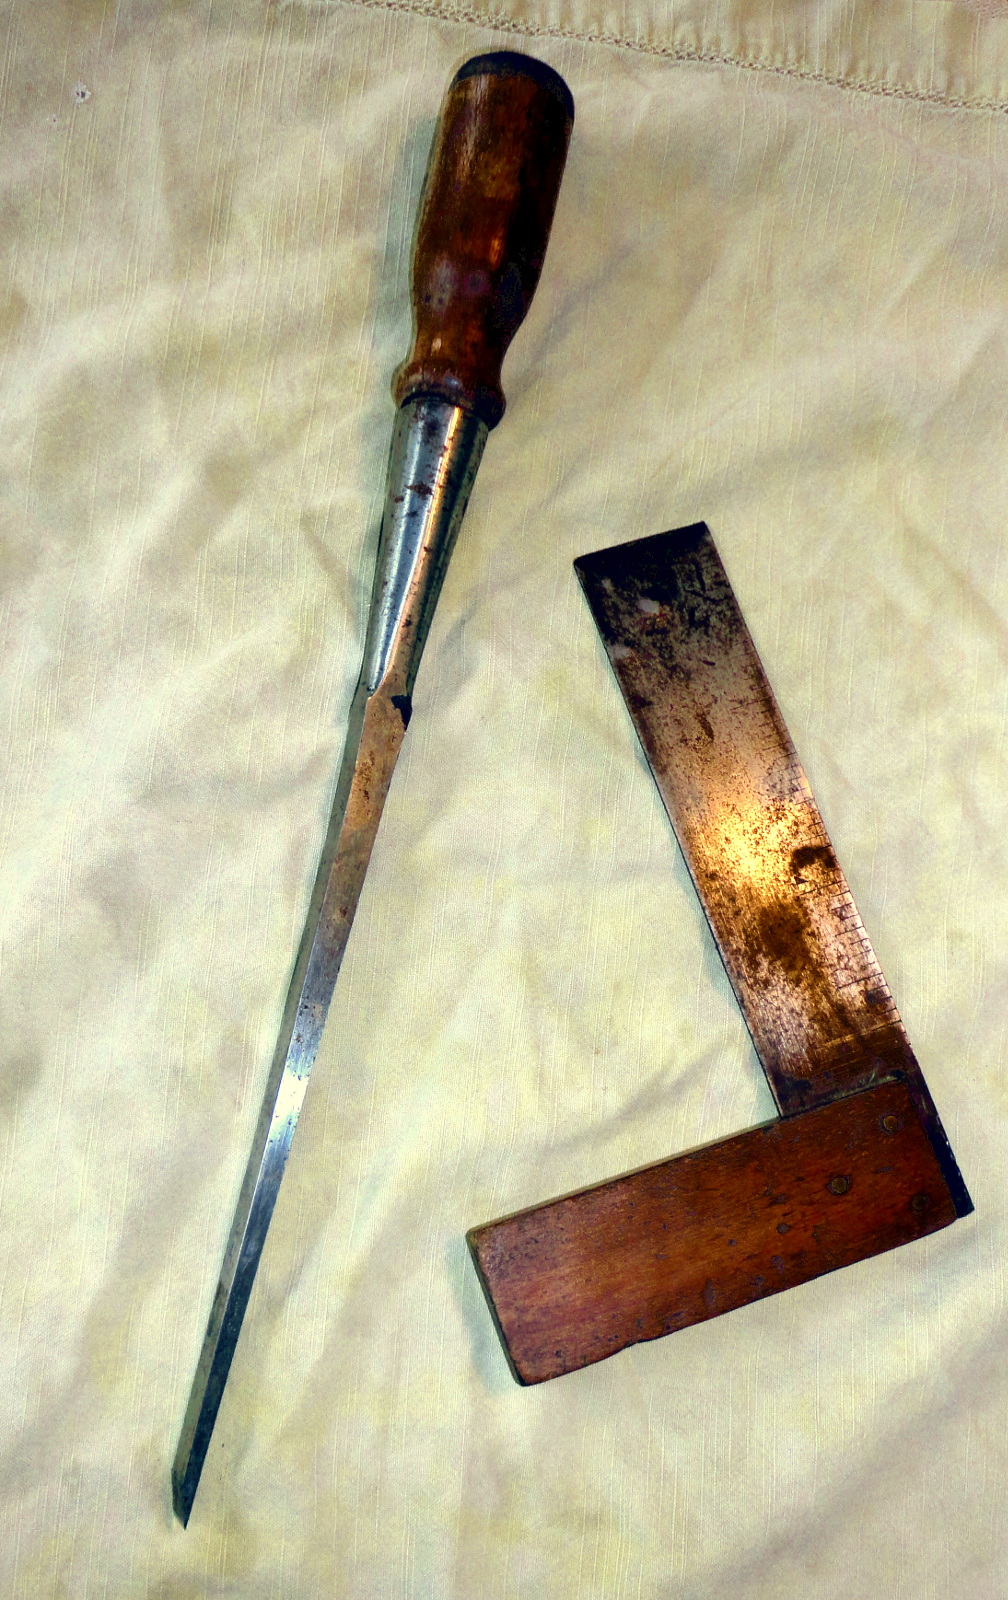
I found a small (6″) square for $1 and a large mortise chisel for $10. Both seemed like a good deal. The chisel was pretty sharp, and only took a few minutes on the water stones to get a good working edge. The square cleaned up to a nice patina. I have no idea if it is square. If it is, I will add it to my usable tools. If not close enough to easily correct, I’ll have to add it to the wall decoration (in the workshop – for no reason I can understand, Susanna doesn’t allow me to decorate the dining room with antique tools).
I took today easy. It was warm enough to work in the shop, but sometimes it is nice to take it easy.
This morning I headed to the Griswold Flea Market. I had time between the boys leaving to go to their mother’s house and when I had to be at Ben’s soccer game (which they lost 5-0, so they are getting better).
I found a 3/8″ socket chisel for $1. It was in good shape, just missing a handle. I also picked up another 1/2″ socket chisel (with handle) for $5.
This afternoon I broke out the waterstones and had a sharpening session. It took no more than 10-minutes to flatten the back and sharpen the new chisels. I also took the opportunity to grind one of my previous flea market finds (a 1/2″ chisel) into a dovetail chisel. I ground a bevel on the sides of the chisel to allow me to clean out dovetails.
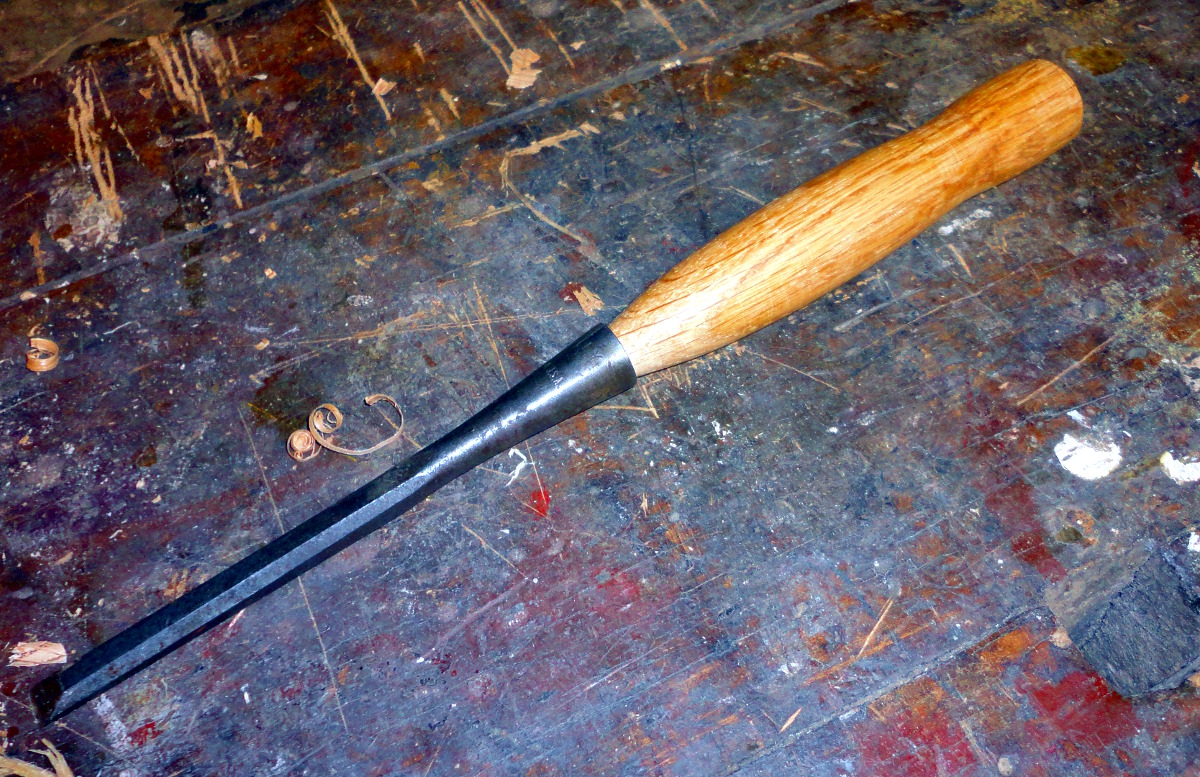
This evening I turned a handle for the socket chisel. I cut a small piece of red oak, and turned it on the lathe. I need to take a class on turning. I suck. However, sandpaper can correct a lot of things. I applied paste wax and hammered the handle into the socket. A perfect fit.
I had to drill a bunch of 1/4″ holes for the counterbore pins for the base of the kitchen island. The base is constructed from white oak. I drilled the first few from the 1/4-inch forstner bit I had on hand. The bit quickly heated up and dulled.
I ordered a 1/4″ carbide tipped brad-point drill bit from Lee Valley. The drill bit arrived on Friday, and yesterday I completed drilling the holes out for the counterbore pins. The 1/4″ bit was $19.70+shipping, and was worth every penny. The bit didn’t overheat, and cut amazingly clean holes.
I’ll be adding to my collection of carbide-tipped drill bits as I need them for projects. I don’t want to put out the money for a full set of the bits right now, so I’ll get them one at a time. Also, these are only designed for drilling in wood, and won’t be used for general household use.
This morning the boys and I visited the local flea market. The boys were on a search for a new toy. I wasn’t looking for anything particular, but of course stopped by the tool vendors to see if anything caught my eye. For $5 I picked up a vintage 1/2-inch socket chisel. The blade was in very good shape, and the price was right. Tonight I decided to sharpen it. I figured I would document how I took an old flea market find and turned it into a sharp chisel. Not that I’m trying to tell anyone else how to do it, but I figured it would be interesting to look back in a few years and see if what I did still makes sense. But maybe by then I’ll only purchase new chisels. Just not from the box store. $5 (if one doesn’t count the cost of the sharpening stones) and 15 minutes on the water stones and I have a much better chisel than any crap one can pick up at a box store.
First thing I did was take a close look at the blade to see how much metal I needed to take off. In this case the blade was in good shape (no pitting or nicks):
Chisel blade before any work is done
Next I get the waterstones ready. It is too cold to work out in the workshop this time of year, so I take over the kitchen:
Set up to sharpen on the kitchen table. I'm guessing I'll have to find a new location once I build the island.
Next I flatten the back starting with the 220-grit and working my way to the 8000-grit stone. I use a thin ruler on the edge of the stone so I only have to flatten the back near the tip (it saves a lot of time flattening):
Flattening the back on the coarse stone. I use two hands for this normally (but needed my other hand to hold the camera).
Next I put the chisel in my Veritas honing guide and work my way from the coarse to 8000 grit. I will periodically turn the chisel and flatten the back as I work (to get rid of the wire that forms when aggressively removing metal). For this chisel, the process took only 5 minutes to sharpen the bevel. I sharpened this with a 30-degree bevel angle:
Sharpening the bevel. Only sharpen on the pull stroke. This is on the 220 grit stone. I have a 120 grit stone if I need to really remove metal.
When I get to the 8000 grit stone, I set the sharpening jig up to add a micro-bevel. On this chisel, I alternated with polishing the micro-bevel and the back (with the chisel in the jig) a couple of times on the 8000 grit stone. I did this until I was satisfied that the entire edge was sharp.
The final results. Nice and sharp. Now to go try it on some wood.
Some of the most useful tools in my workshop are the tools that I have built. The “saw bench” is one of the tools that I use almost every time that I am in the shop. I have three currently in the workshop. One is sized for me to use when using a hand saw to cut lumber. Two are a bit shorter so the boys can use them. They are simple to build and used lumber I had sitting around the shop.
The primary purpose of the saw bench is to hold a piece of wood at the proper height for cutting. They are also good for using as a step stool to reach the top of the shelves in the workshop as well as a seat to sit on when taking a break.
They aren’t too difficult to make. A quick search on the internet will turn up a bunch of easy plans. I would suggest that a matched pair of these would be useful in any shop. The first one I made was built as a project in the first semester of the Hand Tool School. The last two were inspired from Popular Woodworking’s traditional saw bench article. I didn’t add the ripping notch at the end of the boys’ benches – I suspect that they will use them more like a traditional workbench for a while.
If you go to a woodworking store, such as Woodcraft, you can find a plethora of bar, pipe and parallel clamps from companies such as Bessey, Jet and Jorgensen. They range in price from $30 to $45 each. If you go to a box store, such as Home Depot, you can find a pipe clamp for under $20 (plus you have to purchase an appropriate sized pipe to finish the clamp).
When I took a woodworking class at the Connecticut Valley School of Woodworking, they had rows of aluminum bar clamps. They were “Universal Bar Clamps” by the Dubuque Clamp Works company. You can buy the clamps from several online retailers, including Woodcraft. You can also save money and purchase them directly from the manufacturer (USA Clamp Company). The main page of the company’s website is not working, but the pages for the clamps works. I called them this week, and they said that they took the front page down because they were swamped with orders, but they will ship clamps if I order directly from them.
The clamps are great. They don’t have as much clamping pressure as a traditional pipe clamp, but they have enough for most purposes. I will probably use the pipe clamps to glue up the thick top for the kitchen island, but that type of glue up is the exception. The universal bar clamps sit flat on the workbench, and the aluminum doesn’t stain the wood. To top it off, they are made in the USA.
Several years ago I split an order of 10 of the longer clamps (48” clamps I believe – I don’t have one of them in front of me right now). The only drawback is how long they are. That is a lot longer than I need for most glue-ups. So, this week I ordered 10 of the 24” clamps to split with one of the guys I work with.
I can’t believe I actually purchased these. It is completely useless crap. It functions neither as a proper chisel or a proper rasp. Please don’t ever purchase one of these. I’ll give you mine. No wait, I won’t even do that. I’m throwing them away. They have been sitting in a toolbox for a couple of years now just waiting for me to throw them away.
What is wrong with them? They can’t be used as a proper chisel (the rasp portion is in the way of close cuts). They can’t be used as a rasp (you need to hold both ends of a rasp, the second end on this one is the sharp end of the chisel). Maybe you can open cans of paint with them. But mainly they will sit in your toolbox until you get frustrated enough to throw them away.
I’m guessing whoever designed them had never worked with either tool before. And the idiot in marketing that thought they should sell them… The set is about $20 at Amazon. Don’t purchase them.
This weekend I’ll spend some time cleaning out the workshop and getting rid of other tools that I don’t need or that don’t work.
One of the quickest ways to fasten two pieces of wood is to use screws. But not all screws are the same. Years ago I started by using drywall screws from the big box store. They are good for drywall, but that is it. They have very little strength. Currently, I get my screws from McFeely’s. Their square drive screws are much easier to use than normal philips head screws (there is a much more positive connection between the driver and the screw).
I would recommend starting with a #8 flathead screw assortment of whatever finish you like. And currently McFeely’s is having a $1 shipping and handling special (for the continental US only).
Cam Out Torque table for different types of screws (from the McFeely’s FAQ section of their website)
I have a couple of clamping squares – they are useful for making sure that corners are perfectly square when I do glue-ups. I have one from Woodpeckers Precision Tools. It is a beautiful piece of machined aluminum:
Woodpeckers clamping square
I love the the tools from Woodpeckers. All the ones I have used are high quality and precise. Not the cheap tools one can get from the local stores.
I have two larger plastic clamping squares from Rockler. They are plastic, and of course don’t have the fine feel of the machined aluminum. However, they are a little larger (and easier to clamp), and work just as well for the projects I have needed them for. They are also a little cheaper:
Clamp-it square from Rockler Woodworking
I only have 3 total clamping squares and have been able to get by with that many. Another 2 would be useful at times. I might recomment starting with a pair of the aluminum ones, on sale now at Woodpeckers. The Woodpeckers tools are made in the USA as well.